Purchasing a Product to Support a Participant in a Team Fundraising Event
If a fundraising event offers products for purchase that count as donations, you can quickly and easily review the product information and make your selections, and then enter your payment information online (for example, your credit card, bank account withdrawal or PayPal account information if available). You an also include an additional donation amount along with the product purchase.
Instead of applying your gift to a specific participant, you can purchase the gift to support an entire team of fundraising participants.
Notes:
- Not all forms of payment are offered for all fundraising events.
- If you prefer not to make online payments, you can also contact someone participating in the fundraising event or the organization office and arrange to make a cash or check payment to them directly instead
- You can always choose to support the event without making a purchase.
Step 1: Display the Product Information Page
Click the link on the Greeting page of the fundraising event or in the email you received.
Step 2: Identify the Participant to Credit with the Purchase
- On the Product Information page, click the Credit my purchase to count towards the fundraising goal of a PARTICIPANT option.
- Enter all or part of the First and Last name of the participant and click Search.
Note: The more information you provide, the easier it will be to locate the correct participant.
- From the search results displayed, click the appropriate participant and click Next.
Step 3: Configure Your Purchase
On the Product Details page:
- In the Configure section, enter or select any configuration options.
- In the Tribute section, to purchase this product to honor someone who has died or is struggling with the condition associated with the fundraiser, enter the name of the person and make any other entries or selections in the fields displayed.
- Click Add to Cart.
Step 4: Send a Card About the Purchase (if displayed)
- On the Send a Card page, click the appropriate option.
- If the Select Card page displays, click the appropriate eCard to send and click Next.
- On the Send Card To page, complete the information and click Continue.
Step 5: Optionally, Purchase Another Product
On the Store page, click the Configure button and repeat Steps 2 -4 above.
Step 6: Optionally, Add a Donation to the Purchase
On the Store page:
- Locate the field for an additional Gift Amount (typically near the top of the page).
- Enter the monetary amount of your gift.
- Click Add to Cart.
Step 7: Review and Update Your Purchases
On your Shopping Cart page:
- Review the items you have selected and configured.
- Make any adjustments and click Update Cart.
- Click Continue Checkout.
Step 8: Complete the Shipping Information (if applicable)
On the Shipping Page page, to ship the products purchased:
- To yourself:
- Fill in the information on the page.
- Click the This is also my billing address checkbox.
- Click Ship to This Address.
- Click Continue.
- To multiple people (which can include yourself too):
- Click Ship to multiple addresses.
- On the Shopping Cart page that displays, for each item:
- Click a saved address from the drop-down.
- Or, click Enter a new address, supply the information, and click Continue.
Notes:
(*) If the Gift Note field displays, enter a short note and your name before clicking Continue.
(*) If you are one of the recipients, click the This is also my billing address checkbox to populate the Billing Information fields automatically.
- When you have finished, click Continue Checkout.
Step 9: Enter Your Gift Recognition Name (if applicable)
By default, the name entered for your Billing Information will display in the fundraising honor rolls that show gifts. To change to another form of your name or another entry (such as The Smith Family), enter that in the Recognition Name field provided.
If you do not want your name to display in the honor rolls, enter Anonymous or click the Anonymous checkbox if displayed.
Step 10: Enter Your Gift Recognition Name (if applicable)
By default, the name entered for your Billing Information will display in the fundraising honor rolls that show gifts. To change to another form of your name or another entry (such as The Smith Family), enter that in the Recognition Name field provided.
If you do not want your name to display in the honor rolls, enter Anonymous or click the Anonymous checkbox if displayed.
Step 11: Enter Your Payment Method
Click the appropriate Payment Method option and carefully enter the information requested.
Notes:
- For credit cards:
- You can include spaces in the number or enter the number without them.
- The CVV field is used as part of the authorization process with the card issuer to be sure you have the card card in-hand.
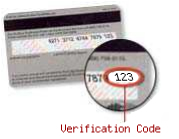 |
On Visa, Master Card, and Discover, your CVV is a 3-digit number printed on the back of your card in the signature panel after the account number.
|
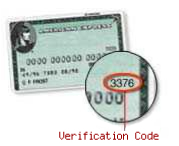 |
On American Express, your CVV is a 4-digit number printed on the front of your card above and to the right of the embossed account number.
|
- For bank account withdrawal, the Bank Routing Number identifies the bank and its branch location. It typically precedes your account number on your check.

Step 12: Confirm Your Purchase
After carefully verifying all of the information, click Process.
 If this or a similar Sharing Opportunity link displays on this page, you can use it to quickly and
easily post a comment on your favorite social sites about the
activity associated with it. The post (or, tweet) will contain a link
back to an appropriate page on this site where your friends can
pursue the activity (for example, make a donation, join your
fundraising team, or take a political action alert). For assistance,
refer to
Sharing an Activity from this Site With Sharing an Activity From This Site
With Your Friends on Your Social Pages. If this or a similar Sharing Opportunity link displays on this page, you can use it to quickly and
easily post a comment on your favorite social sites about the
activity associated with it. The post (or, tweet) will contain a link
back to an appropriate page on this site where your friends can
pursue the activity (for example, make a donation, join your
fundraising team, or take a political action alert). For assistance,
refer to
Sharing an Activity from this Site With Sharing an Activity From This Site
With Your Friends on Your Social Pages.
Step 13: Review the Confirmation Page and Print It
When the Confirmation page displays, review the transaction to be sure the purchase and any shipping information are correct.
To keep a record of this transaction, click Print this page for your records and follow the standard procedures for printing from a web page.
|