|
|
Online Help |
| Help Table of Contents |
Enabling Constituents to Share Stories, Photos and More
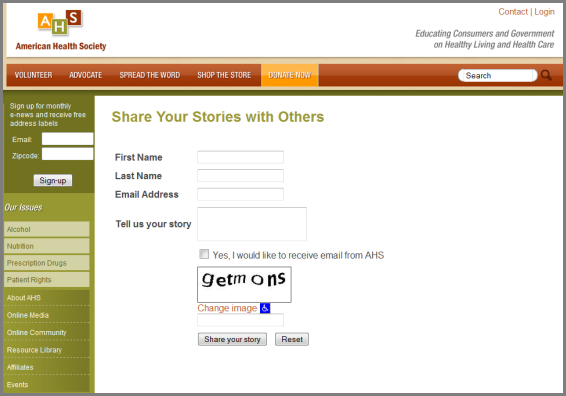
Allowing constituents to share personal stories, photos, and so on creates a higher level of engagement and a sense of ownership. This in turn leads to more frequent action by constituents such as donations or volunteering. The user-facing page typically consists of a form (for constituents to complete), and a list component to display other site visitor's submissions.
When users submit a completed Create Content form, it creates a content item. Therefore, submissions can be treated like any other content item and may be configured for content relationships, dynamic lists, search, and workflow. Each submission is added as an interaction to the Constituent profile. Finally, when you create the form, you can assign it to an approval workflow, save it in draft form, or allow it to be auto-published.
See the following sections for details:
Editing the Create Content Form
Editing the Content Type after Adding Create Content Forms
Managing User-Submitted Content
Adding Create Content Forms
The process of adding a user submission or a Create Content form to a site involves the following steps:
Design a Content Type for User Submissions
It is recommended that you create a separate content type for user submission forms if only users will be submitting the form. However, if both administrators and users will be submitting content, use an existing content type. Whether you are creating a new content type or using an existing content type, you must edit the Author Entry form to include all the fields that you will need for the Create Content forms. If you add a field to a Create Content form that is not in the Author Entry form, the data submitted by constituents for that field will not be collected.
Warning: Be careful when editing Content Types after you have added Create Content forms to a web page. Certain changes can render the form invalid. Furthermore, if the page with the form is unpublished, when you publish it, any submissions made with that form will not create a content type.
To edit the Author Entry Form:
You can base Create Content forms on any content type. Keep in mind that, when a user submits content, it creates a new content item. So, select a content type appropriate for the content you are gathering. For example, select a web page for users to submit personal stories, or an image content type for users to submit photos of their pets. For more information on content types, see Creating a New Content Type.
Then edit the Author Entry form so that it includes all fields you may need to add to your Create Content forms (you can have more than one Create Content form per content type).
Tip: Plan and design the Create Content forms before you edit the Author Entry Form so that you know which fields to add.
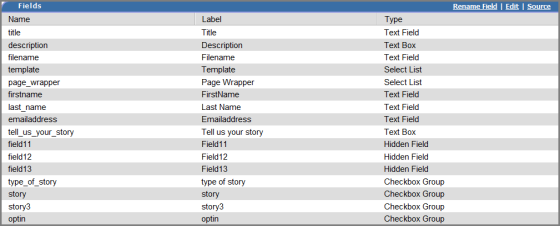
- Open the content type's Properties page.
- In the Fields area, click Edit. The Visual Editor displays.
- Edit the form so that it contains all the fields that you need for the Create Content forms. See Creating Web Forms for details.
- Click Save to return to the content type's
Properties page. You can see the new fields in the Fields section.
Now you are ready to build the Create Content form.
Build a "Create Content" Form
The Create Content form differs from the Save Data form in that, instead of collecting data that can be downloaded in a CSV report, the Create Content form creates a new content item and has more sophisticated reporting. The Create Content form is for creating user-generated content. When building the Create Content form, you configure its properties (such as which Content Type it is based on, who the content owner is, what folder to store submissions and so on) and edit the form in the Visual Editor.
To build a Create Content form:
- Open a new web page in the Visual
Editor.
Note: Before building the Create Content form, you should design and configure a content type for the form. For details, see Design a Content Type for User Submissions.
- Click the Form Console button.
The Choose Form Actions dialog displays.
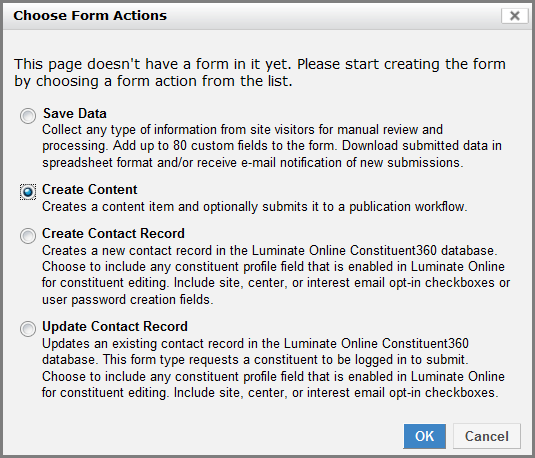
- Select Create Content and click
OK. The Create Content Form Properties dialog displays.
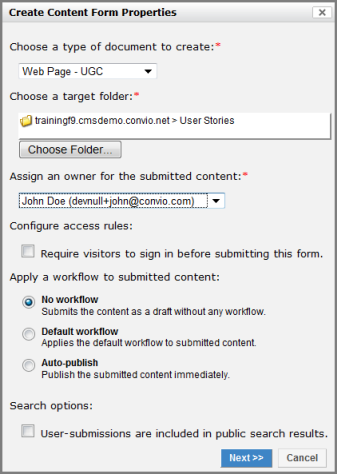
- Complete the fields as
needed:
- Choose a type of document to create - Select the content type to which you want to add the Create Content form. See "Design a Content Type for User Submissions" for details.
- Choose a target folder - Select a folder in Website Explorer to store the submitted content.
- Assign an owner for the submitted content - Select from a list of folder managers for the selected folder. This is the person who can publish content that is not assigned to a workflow (the No Workflow setting).
- Configure access rules - Select whether or not to require constituents to sign in before submitting content.
- Apply a workflow to submitted content
- Select how the submitted content will be published:
- No Workflow - The default stores the submitted content in the target folder. It remains in draft form until it is manually published.
- Default Workflow - Sends submitted content through the default workflow to be approved and published.
- Auto-Publish - Immediately publishes
the content on the site without approval.
Caution: Allowing content to be automatically published without approval may result in harmful material being posted on your site.
- Search Options - Select whether or not you can search on the item from any published web page that uses a search function either in the page body or the wrapper. For details, see Understanding Advanced and Public Searches.
- Click Next. The General Properties dialog displays.
- Complete the general properties as needed and
click OK.
See Configuring Overall Web Form Properties and
Notifications for details. The fields from the Author Entry Form display with a few changes. For example, a Captcha field and Submit and Reset buttons are added. Fields that are not applicable to users such as template and file are removed.
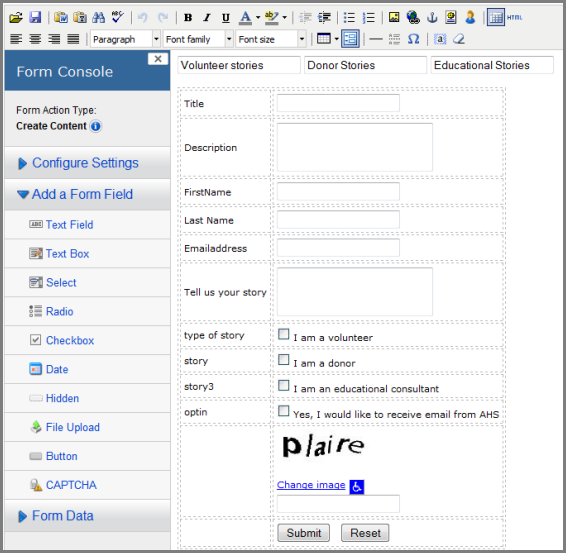
- Edit the form as needed.
Typically, you will be deleting fields intended for other Create Content forms
in the same content type. See Customizing the Create Content Form for more information. If you add fields that are not in the Author Entry form, any data submitted in those fields will not be collected.
Note: In some cases, you will want to add a list component so constituents can view submitted content. See To add a list component for details.
- Click Publish. The
Publishing a Document dialog displays.
The Create Content form is listed under the Author Entry Form in the Forms area (of the content type's Properties page.)

Editing Create Content Forms
After you build the Create Content form, any edits you make must adhere to the content type definition. This means that:
- Fields that are required in the Author Entry Form are also required in a Create Content form, except for the Title field. Although it is required in the Author Entry form, it is not required in the Create Content form.
- The field data types in the Create Content form must match the field data types in the Author Entry form.
- Fields in the Create Content form that do not exist in the Author Entry form are ignored.
With that general principle in mind, here are some tips and other rules when editing the form in the Visual Editor:
- Adding an additional field that is not in the author entry form may be useful, but no data will be collected. For example, adding an "I agree" checkbox after legal verbiage.
- You can remove an optional field, but you cannot remove a required field, except for the Title field. Although it is required in the Author Entry form, it is not required in the Create Content form.
- You can use a hidden field to provide a default value that will not appear on the published form. This is a helpful tool in that it provides a way for administrators to sort submitted content.
- You can change a form field type (for example, change a multi-select into a single-select or change a single-select into radio buttons) as long as the data types match the Author Entry form.
- A CAPTCHA field is always required to protect your site from spam bots.
Editing the Content Type after Adding Create Content Forms
Changing the Author Entry form in the Content Type impacts any existing Create Content forms based on it. If the changes break any of the rules above, forms that are invalidated are highlighted in pink in the Content Type's Properties page.
Warning: If the invalidated form is on an unpublished page, when you publish the page, any submissions made with that form will not create a content type.

You will have to edit the Create Content forms manually to fix any validation errors and republish. For example, if you add a new required field to the Author Entry form, you will have to add the required field to every Create Content form related to this content type.
Managing User-Submitted Content
- To add a list component
- To create a content filter for website visitors
- To view a list of content submissions
- To track submissions in the user's profile
- To approve and publish content
- Sending an email notification when an item is submitted
To list the user submissions next to the submission form in order for site visitors to view the content, add a List component. The list will be filtered by website visitors using a content filter.
For details on the list component, see Using the List Component.
- Create a content filter to list only constituents that have submitted content. See To create a content filter for website visitors only.
- Open the same page to which you added the form in the Visual Editor.
- Click outside of the form table.
- Below the title click the Insert Component button. The Insert Component dialog displays.
- Select List from the Component Type selection menu. The List Properties dialog displays.
- Enter the following required
information:
- Choose a type of document to list - Select the content type that this form belongs to.
- Choose a list template - Select a list display template. See Configuring a List Display Template for details.
- Filter documents by criteria - Select the content filter you created for your form. See To create a content filter for website visitors.
- Click OK. You can now save and publish the form.
To create a content filter for website visitors:
If you add a List component to the user submission form, create a content filter to sort by content authored by website visitors only.
For details on content filters, see Working with Content Filters.
- Click Reports and Tools > Content Filters. The Content Filters administration page displays.
- Click the New Filter
button. The New Content Filter dialog displays.
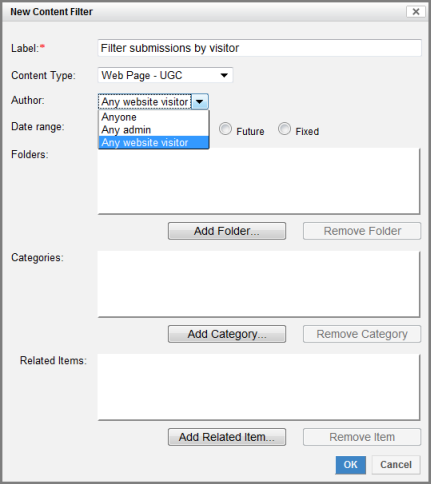
- Enter the following information:
- Label - Create a name for the content filter. This is for internal use only and does not display to constituents.
- Content Type - Select the content type you created for Create Content forms.
- Author - Select Any website visitor.
- Add any Folders, Categories, or Related Items if needed and click OK. The new filter appears in the list of content filters.
To delete a Create Content form from a content type:
- In Website Explorer, select the Create Content form and click Delete. The form no longer appears in the content type's Properties page.
To view a list of content submissions:
- Click Content Types > [your content type] > Properties to view the properties page of the content type that contains the Create Content form.
- In the Forms area, click the title of the form. The properties page displays.
- Click the Form Data
tab. In the Submitted Content area, the number of submissions displays.

- Click List Items.
A list of all the new content types created (submissions) for the Create Content form displays. From here you can view details of
each item, or click to view an individual item's properties page and folder.

To track submissions in the user's profile:
- In Constituent360, open the user's profile.
- Click the Interactions tab.
- Click CMS Create Content Form Submitted under Select the Interaction Types to display for this constituent.
- Click Filter. Any items submitted by the Constituent are listed below.
To approve and publish content:
If you did not assign a workflow to the form, you will need to manually publish each submission.
- In Website Explorer, navigate to the folder containing the submitted content items.
- Click an item to view the Properties page.
- Review the content and click Publish Now in the Properties page.