|
|
Online Help |
| Help Table of Contents |
Adding a Constituent Registration Form
Parent Topic: Creating Web Forms
When constituents submit a Luminate CMS registration form, they automatically create and update their Constituent360 profile. The Form Console has two forms for this purpose, Create Contact Record and Update Contact Record.
Click one of the following links for more information:
Create Contact Profile Forms
When you build a Create Contact Profile form in the Visual Editor, all the Constituent360 fields enabled for your site are automatically added. You then add, delete, and edit them as needed. If any centers or interests are associated with the constituent, you can add multiple, center- or interest-specific email opt-in checkboxes. The minimum field required to publish a Create Contact Profile form is email address.
Note: The Constituent360 fields available in Create Contact Profile forms vary depending on how your site is configured. To change the fields enabled for your site, contact Convio. For a list of all available fields refer to GetUser API and the listUserFields API.
To add a Create Contact Profile form:
- Click the Form Console
 button on the Visual Editor toolbar. The Choose Form Actions dialog displays.
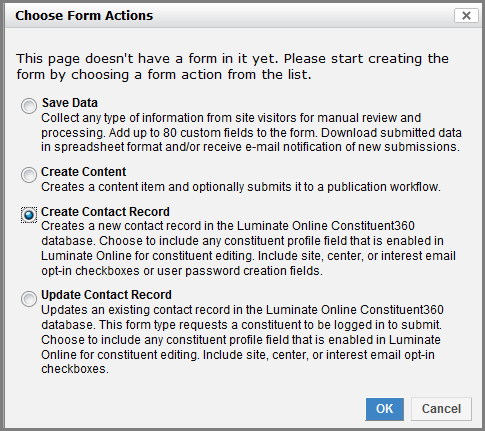
- Select Create
Contact Profile and click OK. The Create Contact Record dialog displays.

- In the first field, click the Choose Item button to select the page to which constituents are redirected if they are already logged in.
- In the second field, click the Choose Item button to select a sign-in page to which constituents are redirected if they submit information for an existing contact. When you are done, click OK. The General Properties dialog displays.
- Select the form properties and click
OK. See Configuring
Overall Web Form Properties for details.
The Form Console and Constituent360 fields display. A Captcha field and email opt-in fields are also added. - Delete and edit fields as needed. If any centers or interests are associated with the constituent, you can add multiple, center- or interest-specific email opt-in checkboxes.
- If needed, add fields using the
Add a Constituent Field palette. If you add a field that is not
enabled for your site (mapped to Constituent360), any
information entered in the field will not be saved in the Constituent360 profile.
Note: Do not add fields that are not available in the Field Palette such as advocacy alerts and engagement factors. - Click Save when you are done.
The Update Contact Profile Form
When a constituent updates their information by submitting an Update Contact Profile form, their Constituent360 record is updated. Because the fields are mapped to their Constituent360 Profile, fields are pre-populated with their information when they open the form.
When you create the form, Constituent360 fields are added and you can delete and edit them as needed.
Note: The Constituent360 fields available in Update Contact Profile forms vary depending on how your site is configured. The available fields are those found in the GetUser API and the CreateUser API. To change the fields enabled for your site, contact Convio.
Update and Cancel buttons are also added. If any centers or interests are associated with the constituent, you can add multiple, center- or interest-specific email opt-in checkboxes. When a website visitor logs in and clicks the link to update their profile, the fields are pre-populated with data from their Constituent Profile.
Note: Constituents cannot change their user name or password through a Luminate CMS page; this can only be done through a Luminate Online page.
To add an Update Constituent Profile form:
- Click the Form Console button on the Visual Editor toolbar. The Choose Form Actions dialog displays.
- Select Update Contact Profile and click OK. The Update Contact Record dialog displays.
- In the first field, click Choose Item to select a sign-in page. Constituents are redirected to this page if they click an Update Profile link and are not logged in.
- Click Next. The General Properties dialog displays.
- Select the form properties and click
OK. See Configuring
Overall Web Form Properties for details.
The Form Console and Constituent360 fields display. Update and Cancel buttons and an email opt-in checkbox are also added. - Delete and edit fields as needed. If any centers or interests are associated with the constituent, you can add multiple, center- or interest-specific email opt-in checkboxes.
Note: Do not add fields that are not available in the Field Palette such as advocacy alerts and engagement factors. - If needed, add fields using the Add a Constituent Field palette. If you add a field that is not enabled for your site (mapped to Constituent360), the field will not be pre-populated with information when a constituent opens the form. And any information entered in the field will not be saved in their Constituent360 profile.
- Click Save when you are done.
The Add Constituent Fields Palette
The Add a Constituent Field palette in the Form Console is only available for Create Contact Profile and Update Contact Profile forms. Unlike the fields in the Add a Form Field palette, constituent fields are mapped to Constituent360 which enables constituents to create and update their profile.
Note: The fields available in the Add Constituent Fields palette vary depending on how your site is configured. Although the fields that can be added are those found in the GetUser API and the CreateUser API, your site may not be configured for all of them. If you add a field to a form that is not configured for your site, the information gathered in that field will not be added to the Constituent360 profile. To change the fields enabled for your site, contact Convio.
This section contains the following:
Adding Hidden Fields to Contact Forms
You can hide fields from constituents (except Opt-In fields) just as you can in the Add a Form Field Palette. However, the constituent hidden fields behave differently than standard hidden fields. Standard hidden fields contain static text that can be downloaded in a CSV file; whereas, the constituent hidden fields are automatically stored and tracked in Constituent360. In other words, when a constituent registers with your site or updates their profile, hidden information is also added to their profile such as ???.
Also, there is no Hidden Field button in the Add a Constituent Palette. You have the option to make a field hidden after you select an element such as Biographical or Contact.
List of Constituent Fields
This explains how to work with all the fields in the
Field Palette. Do not add fields that are not available in the Field Palette
such as advocacy alerts and engagement factors.
The palette contains the following fields:
Biographical Fields
The Biographical element allows you to add Name and Biographical Information details.
To insert a Biographical field:
- Click inside a new row and click the Biographical button. The Add a Biographical Information Field dialog displays.
- In the Select a Biographical Field Type to Add, select Name or Biographical Information. A new drop-down list displays below.
- Select a field for that category. Depending on which field you select, several formatting options display below.
- You can select Hidden
so that the field does not display to Constituents, or one of the available formatting options.
A different dialog box displays depending on whether you selected a
formatting option or Hidden (the formatting options vary
from field to field):
- If you select Text Field, the Text Field Properties dialog displays.
- If you select Radio, the Radio Button Group Field Properties dialog displays.
- If you select Select, the Drop-Down Menu Properties dialog displays
- If you select Checkbox, the Checkbox Properties dialog displays.
- If you select Hidden, the Hidden Field Properties dialog displays.
Many fields in the properties dialogs are already filled depending on which field they belong to. For example, if you have selected a State field and a Select type, the Drop-Down Menu Properties lists all U.S. states.
- Configure the properties and click OK. The new field displays in the table.
Contact Fields
The Contact element allows you to add Address, Email, Other Address, Phone, Work Address details.
Note: The Preferred Phone field is only available if is marked as "Admin Can See" in the Luminate Online Database configuration.
To insert a Contact field:
- Click inside a new row and click the Contact button. The Add a Biographical Information Field dialog displays.
- In the Select a Biographical Field Type to Add, select Name or Biographical Information. A new drop-down list displays below.
- Select a field for that category. Depending on which field you select, several formatting options display below.
- Select Hidden
so that the field does not display to Constituents, or one of the available formatting options.
A different dialog box displays depending on whether you selected a
formatting option or Hidden (the formatting options vary
from field to field):
- If you select Text Field, the Text Field Properties dialog displays.
- If you select Radio, the Radio Button Group Field Properties dialog displays.
- If you select Select, the Drop-Down Menu Properties dialog displays
- If you select Checkbox, the Checkbox Properties dialog displays.
- If you select Hidden, the Hidden Field Properties dialog displays.
Many fields in the properties dialogs are already filled depending on which field they belong to. For example, if you have selected a State field and a Select type, the Drop-Down Menu Properties lists all U.S. states.
- Configure the properties and click OK. The new field displays in the table.
Opt-In Fields
The Opt-In field allows you to configure a form so that constituents can opt to receive emails, or configure the form so that constituents are automatically added to email lists. You can add a single site-wide, center-specific, or interest-specific opt-in checkbox, or add multiple center-specific, and interest-specific opt-in checkboxes.
This section contains the following procedures:
To add email opt-in checkboxes
To automatically add constituents to email lists
To add email opt-in checkboxes:
- Click inside a new row and click the Custom Fields button. The Add Opt-In Information Field dialog displays.
- In the Select an Opt-In Field Type to Add, select Center, Interest, or Site-Wide. The Email Opt-In Field Properties dialog displays.
- The first option differs
depending on whether you have selected Center,
Interest, or Site-Wide.
- If you selected Center, select a center from the drop-down list.
- If you selected Interest, select an interest from the drop-down list.
- If you selected Site-Wide, no selection list is available.
- Select Display email opt-in checkbox.
- In the Label field, enter an informational name for the checkbox. The default text is "Sign me up to receive emails about {center, interest, or site}".
- If necessary, select the Checkbox checked by default and click OK.
The email opt-in checkboxes display in the Visual Editor.
To automatically add constituents to email lists:
- Click inside a new row and click the Custom Fields button. The Add Opt-In Information Field dialog displays.
- In the Select an Opt-In Field Type to Add, select Center, Interest, or Site-Wide. The Email Opt-In Field Properties dialog displays.
- The first option differs
depending on whether you have selected Center,
Interest, or Site-Wide.
- If you selected Center, select a center from the drop-down list.
- If you selected Interest, select an interest from the drop-down list.
- If you selected Site-Wide, no selection list is available.
- Select Do not display checkbox: opt user in automatically.
- If necessary, select the Display custom text.
The default text is "By submitting this form, you are agreeing to receive emails
about <center, interest, or site>".
The email opt-in checkboxes display in the Visual Editor.
- Click OK. The opt-in checkboxes or the text for
Employment Fields
The Employment element allows you to add Employer Address and Employment details.
To insert an Employment field:
- Click inside a new row and click the Employment button. The Add Employment Information Field dialog displays.
- In the Add Employment Information Field dialog, select Employer Address or Employment. A new drop-down list displays below.
- Select a field for that category. Depending on which field you select, several formatting options display below.
- Select Hidden
so that the field does not display to Constituents, or one of the available formatting options.
A different dialog box displays depending on whether you selected a
formatting option or Hidden (the formatting options vary
from field to field):
- If you select Text Field, the Text Field Properties dialog displays.
- If you select Radio, the Radio Button Group Field Properties dialog displays.
- If you select Select, the Drop-Down Menu Properties dialog displays
- If you select Checkbox, the Checkbox Properties dialog displays.
- If you select Hidden, the Hidden Field Properties dialog displays.
Many fields in the properties dialogs are already filled depending on which field they belong to. For example, if you have selected a State field and a Select type, the Drop-Down Menu Properties lists all U.S. states.
- Configure the properties and click OK. The new field displays in the table.
Education Fields
The Education element allows you to add post-secondary school details.
To insert an Education field:
- Click inside a new row and click the Education button. The Add Education Information Field dialog displays.
- Select a post-secondary school. A new drop-down list displays below.
- Select a field for that category. Depending on which field you select, several formatting options display below.
- Select Hidden
so that the field does not display to Constituents, or one of the available formatting options.
A different dialog box displays depending on whether you selected a
formatting option or Hidden (the formatting options vary
from field to field):
- If you select Text Field, the Text Field Properties dialog displays.
- If you select Radio, the Radio Button Group Field Properties dialog displays.
- If you select Select, the Drop-Down Menu Properties dialog displays
- If you select Checkbox, the Checkbox Properties dialog displays.
- If you select Hidden, the Hidden Field Properties dialog displays.
Many fields in the properties dialogs are already populated depending on which field they belong to. For example, if you have selected a State field and a Select type, the Drop-Down Menu Properties lists all U.S. states.
- Configure the properties and click OK. The new field displays in the table.
Significant Other Fields
The Education element allows you to add significant other details.
To insert a Significant Other field:
- Click inside a new row and click the Employment button. The Add Employment Information Field dialog displays.
- In the Add Employment Information Field dialog, select Employer Address or Employment. A new drop-down list displays below.
- Select a field for that category. Depending on which field you select, several formatting options display below.
- Select Hidden
so that the field does not display to Constituents, or one of the available formatting options.
A different dialog box displays depending on whether you selected a
formatting option or Hidden (the formatting options vary
from field to field):
- If you select Text Field, the Text Field Properties dialog displays.
- If you select Radio, the Radio Button Group Field Properties dialog displays.
- If you select Select, the Drop-Down Menu Properties dialog displays
- If you select Checkbox, the Checkbox Properties dialog displays.
- If you select Hidden, the Hidden Field Properties dialog displays.
Many fields in the properties dialogs are already filled depending on which field they belong to. For example, if you have selected a State field and a Select type, the Drop-Down Menu Properties lists all U.S. states.
- Configure the properties and click OK. The new field displays in the table.
Custom Fields
The Custom Field element adds custom fields that are configured for your site in the Luminate Online Database Configuration. Custom fields vary from site to site.
To insert a Custom field:
- Click inside a new row and click the Custom Field button. The Add Custom Field Information dialog displays.
- In the Select a Custom Field type to add field, select an option. A new drop-down list displays below.
- Select a field for that category. Depending on which field you select, several formatting options display below.
- Select Hidden so that the field does not display to Constituents, or one of the available formatting options. A different dialog box displays depending on whether you selected a formatting option or Hidden (the formatting options vary from field to field):
- If you select Text Field, the Text Field Properties dialog displays.
- If you select Radio, the Radio Button Group Field Properties dialog displays.
- If you select Select, the Drop-Down Menu Properties dialog displays
- If you select Checkbox, the Checkbox Properties dialog displays.
- If you select Hidden, the Hidden Field Properties dialog displays.
Many fields in the properties dialogs are already filled depending on which field they belong to. For example, if you have selected a State field and a Select type, the Drop-Down Menu Properties lists all U.S. states.
- Configure the properties and click OK. The new field displays in the table.
Related Topics
- Using the Form Console - Explains the Save Data form.
- Creating Web Forms - Overview of the different types of form actions
- Enabling Site Visitors to Share Stories, Photos and More - Explains the Create Content form
- Designing and Creating Polls - Explains how to use the Poll Component and the Form Console to create Polls.