|
|
Online Help |
| Help Table of Contents |
Configuring Gigya for Social Sharing and Open Authentication
To use the Open Authentication or Social Sharing features on your Convio-powered site, you must create an account with Gigya from a special Convio URL and configure certain settings as well as configure certain details on your Convio-powered site.
Before you create your Gigya account, you should understand the Gigya terms of Service and components.
Configuring Gigya involves:
- Step 1: Obtaining Your CNAME Subdomain Alias from your network or Convio administrator to correctly display your organization name on the social sharing and open authentication login pages
- Step 2: Creating Your Gigya Account on the Gigya Site and registering your organization
- Step 3. Adding the Site Description and CNAME to the Site Settings in your account on the Gigya web site
- Step 4: Configuring the External Applications and Keys for the Social Network Providers that Gigya uses to mediate between your site and the social network providers you will support for your constituents
- Step 5. Configuring the Gigya Details on Your Convio Site to add the API and Secret Keys required by Gigya
Understanding Gigya Components and Terms of Service
Gigya provides the following social media components free of charge to you for use ONLY on your Convio-hosted PageBuilder or CMS pages:
- Login Plugin that constituents can use to register and sign into your site using a preferred social network account
- Share Plugin that prompts constituents to share after completing an action on your site (for example, leaving a comment, making a donation or purchase, and so on)
- Share Bar that enables constituents to share, bookmark, and email site content by clicking a button
Under the Member Agreement Terms of Service, using these components on other pages is not allowed and you must contract with Gigya separately for such use. You must also contract with Gigya for use of other Gigya components.
Although you can use either integrated plugins (developed by Convio) or native Gigya plugins, using the integrated plugins is recommended to enable:
- Your Site Administrators to easily insert Convio S-Tags or WYSIWYG components from the Editor to dynamically generate content without having to know complicated HTML coding
- Social Sharing interactions to be automatically tracked and available in the interactions reports
- Open Authentication interactions to be automatically recorded in constituent profiles and available in the interaction reports
- Access Convio Client Care for support when needed
If you choose to use the more flexible and stylable native Gigya plugins, you must create custom interactions to track and report on the Social Sharing and Open Authentication interactions. These custom interaction are considered web customizations, which are not supported by Convio Client Care.
Support Information: Convio Client Care will support issues that arise between the Convio API and Gigya API even though you will accept the Gigya Terms and Conditions when you create your Gigya account. For issues or questions that arise with your Gigya implementation, contact Convio Client Care first. Depending on the situation, Convio Client Care may escalate the issue with the Gigya support team on your behalf.
Step 1: Obtaining Your CNAME Subdomain Alias
To avoid displaying Convio on the Social Sharing and Open Authentication login pages and components, you should use a subdomain alias for your convio.net site (referred to as a CNAME).
If your organization manages its own domain name server (DNS), request that your network administrator create a CNAME in the format socialize.xxx.org where xxx is your site name and point it to socialize.gigya.com.
Or, if Convio manages your DNS, ask Convio Services to open a Salesforce ticket requesting that Production IT create the CNAME for you in the format socialize.xxx.org where xxx is your site name and point it to socialize.gigya.com.
You must have this CNAME before you continue.
Step 2: Creating Your Gigya Account on the Gigya Site
You must create an account on the Gigya site through a URL containing special Convio reference ID that enables Gigya to integrate with your Convio-hosted site. You (or someone from your organization) must create your own account on Gigya and accept their Terms of Service as explained in the section containing the instructions for configuring your account.
IMPORTANT: If you have an existing Gigya account created from a URL other than www.gigya.com/site/Register.aspx?ref=Convio, contact Convio Client Care for assistance.
You can have only ONE Gigya API key for your site. If your organization has multiple branches or affiliates, you most likely want to create your Gigya account (abd all associated social site accounts and applications) at the highest level of your organization to have your main (or, national) branding displayed on all social network pages.
For example, if your organization has 5 affililates (like Northeast, Southeast, Midwest, Southwest, and Midwest) that each have their own Facebook application, you can create one national Facebook application that displays your organization title when someone connects rather than individual the affiliate title.
-
Click the following URL to display the Gigya Account registration form:
http://www.gigya.com/site/Register.aspx?ref=Convio -
Complete the details on this registration page.
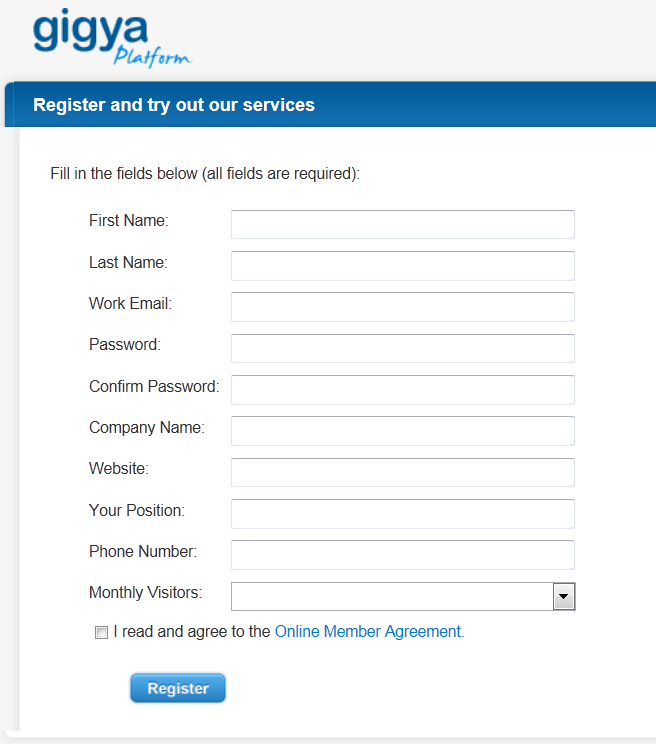
Notes:
(1) For Website, be sure to enter the domain name of your Convio-hosted site (for example, xyzorg.convio.net). If you have affiliate sites, be sure to use the top-level name to display the national name and not one of the affiliate site names.
(2) Be sure to read the Online Member Agreement and then click the checkbox. - When you are finished, click Register.
- When the Dashboard page displays, continue on to adding a site description and your CNAME.
Step 3: Adding the Site Description and CNAME
Your site settings include a description to help others understand the purpose of your site and mission as well as a CNAME subdomain alias for your Convio-powered site (other than yoursitename.convio.net).
Entering the subdomain alias, or CNAME, is important to be sure that the name of your organization is displayed to your constituents instead of confusing them by displaying Convio while they are logging in or accessing a social sharing or open authentication page.
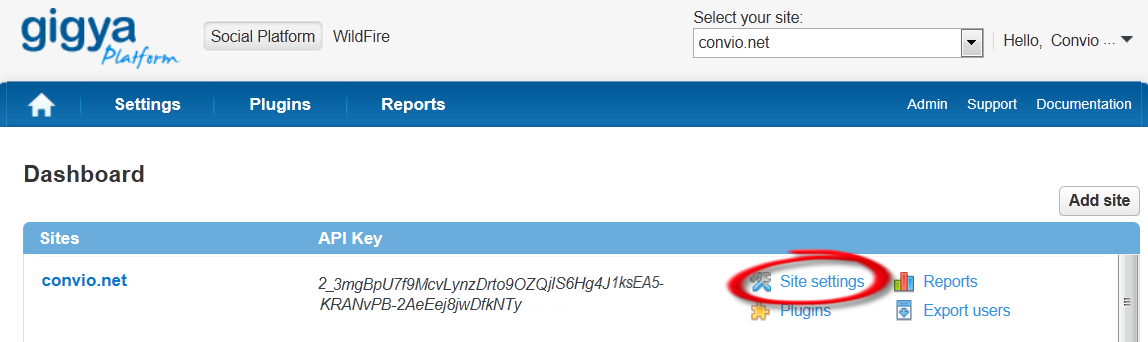
-
On the Dashboard page, locate your site and
click Site Settings.
-
On the Site Settings page:
- For Site Description, enter a phrase that helps others understand the purpose of your site. You can enter up to 85 letters, numbers, and spaces.
-
In the URLs section, review the two URLs that Gigya
automatically filled in from the information you provided when
creating this account to be sure they are correct.
Notes:
(1) This unique URL indicates indicates that you have a Convio-hosted site and is enables the communication between Convio and Gigya. If this URL does not display, contact Convio Client Care for assistance.
(2) DO NOT ENTER ANY URLS. If you have other Convio-hosted sites that you want to associate with this account, contact Client Care. -
For Domain Alias (CNAME), enter the CNAME
you obtained from the network or Convio administrator.
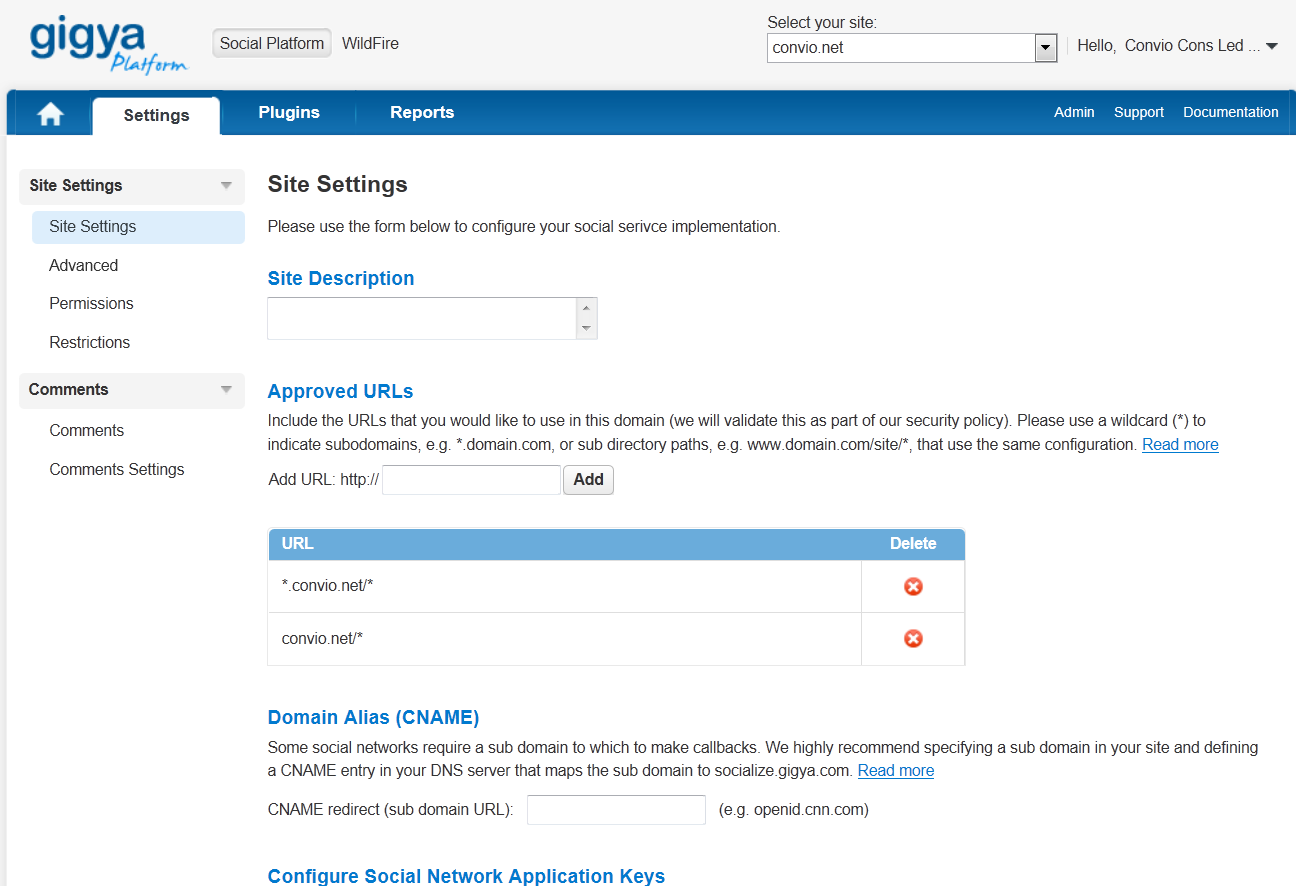
- Scroll to the bottom of the page and click Save Settings.
- Continue on to configuring the external applications and keys for the social networks you plan to offer to your constituents.
Step 4: Configuring the External Applications and Keys for the Social Networks
The Gigya service uses external applications to communicate with the following social network providers to get details about your constituents as they log in and for sending messages.

Each supported social network must have its own dedicated application that uses the branding for your organization when constituents are logging into their social site instead of displaying Gigya to avoid confusing them. The links back (like the "10 minutes ago via site_name" message displayed at the bottom of a Facebook post) can be configured to add more content if you have Administrator privileges for your account from Gigya. (Contact Gigya Support directly to request an Administrator account if necessary.)
To configure the external application and keys required for each social network you intend to offer your constituents, follow the instructions provided by Gigya.
Notes:
(1) A ![]() in the right corner of a network indicates that the provider requires configuration while a
in the right corner of a network indicates that the provider requires configuration while a ![]() means that the configuration has been completed or is not required.
means that the configuration has been completed or is not required.
(2) Although the social site keys are maintained in your Gigya account (and can be retrieved from your settings), a storage page for recording these keys is provided in Convio as well for convenience.
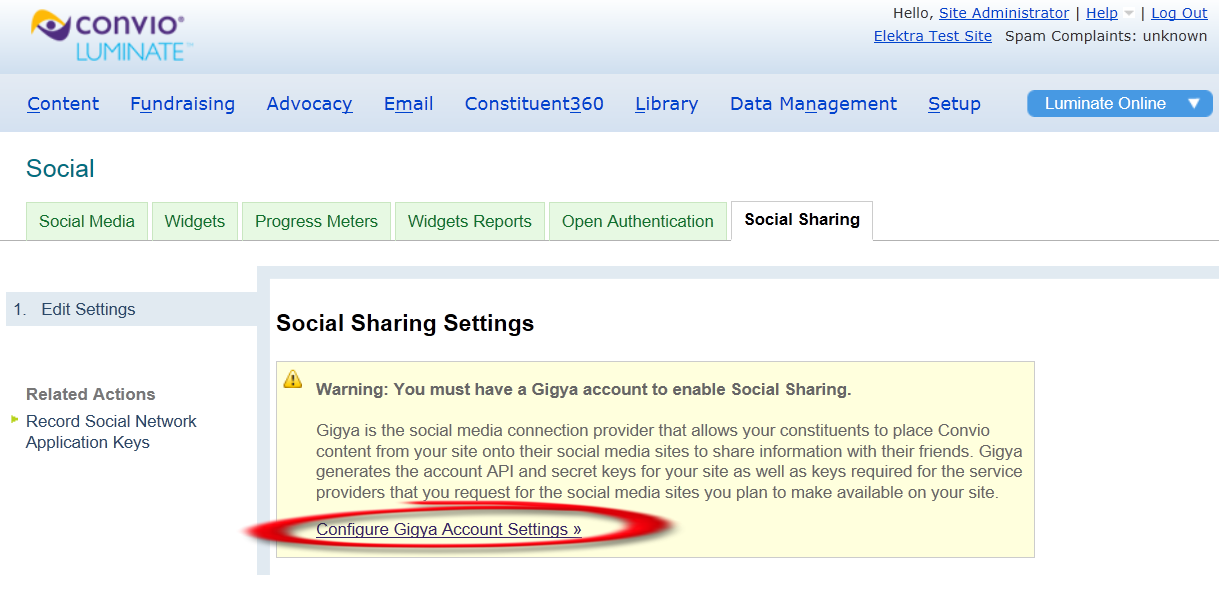
Step 5. Configuring the Gigya Details on Your Convio Site
To use the Social Sharing and Open Authentication features, you must enter the secret keys for your Gigya account on your Convio-powered site.
You only have to enter the Gigya API and Secret keys one time - for either Social Sharing or Open Authentication.
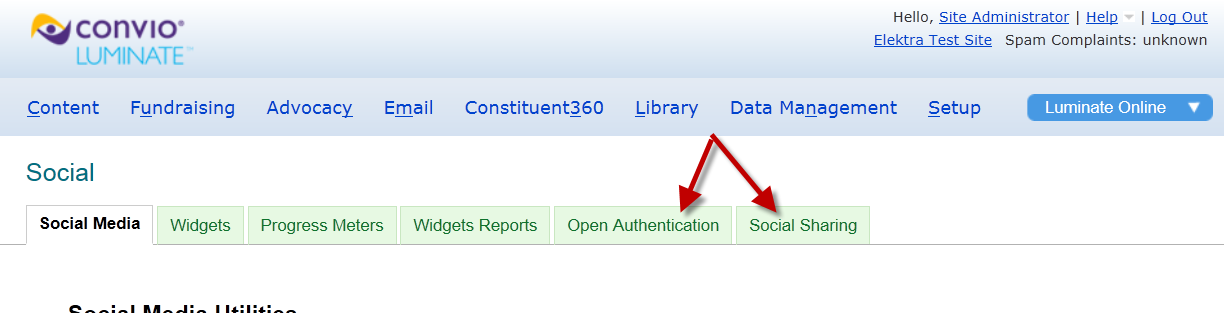
- On your Convio-powered site, log in to the Admin console.
- From the options along the top, click Constituent360 > Social Media.
-
From the tabs along the top of the Social Media
page, click either the Social Sharing tab or
the Open Authentication tab.
-
On the page displayed, click the Configure Gigya Account Settings
link.
-
On the Edit Settings page, enter the keys requested.
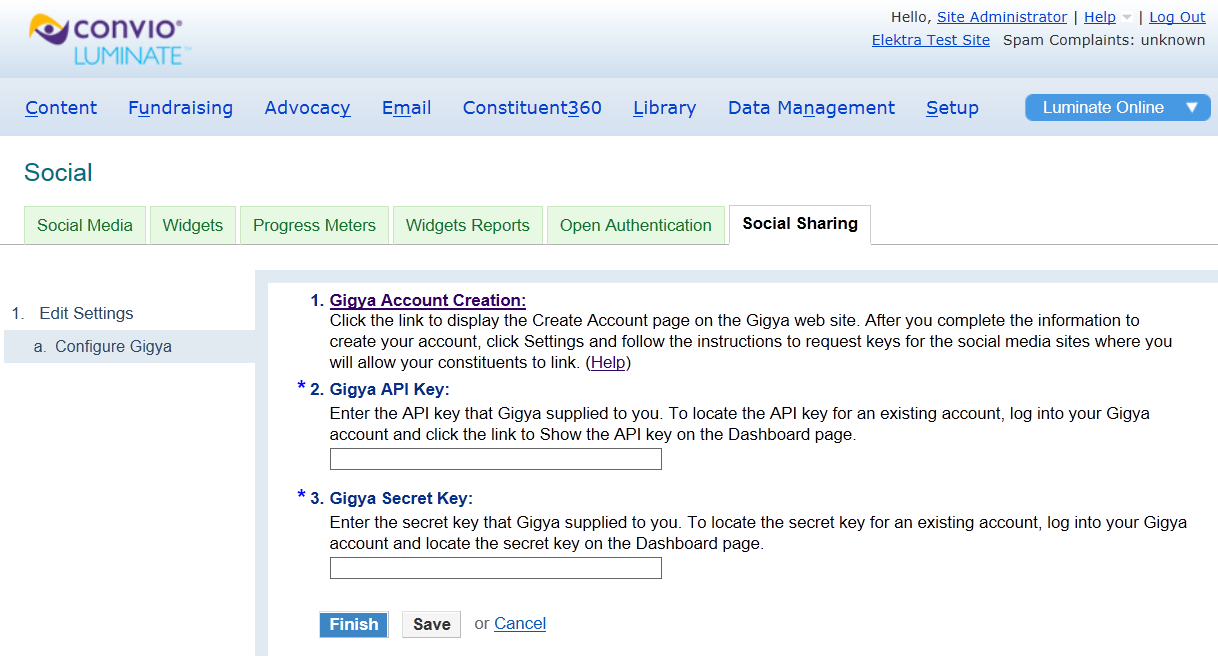
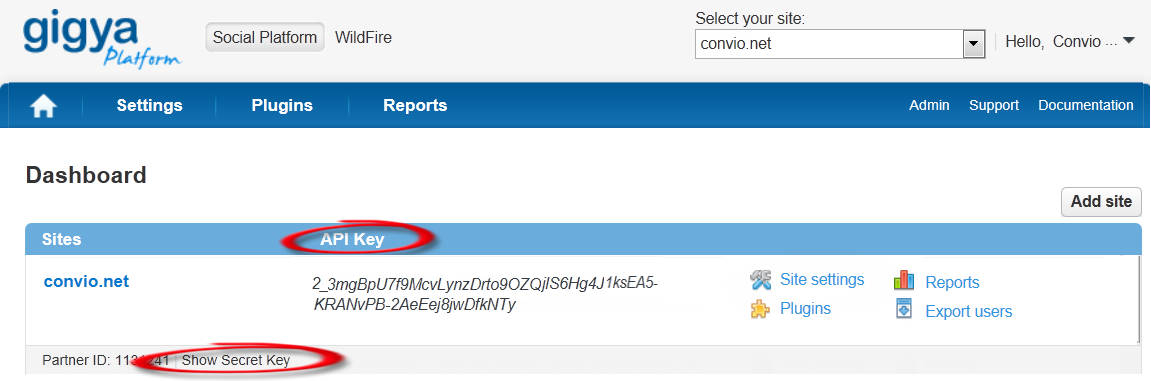
To locate the keys:- Log into your Gigya account.
-
On the Dashboard page:
- The API key is listed in the Sites area.
-
The Secret key is available by clicking the
Show Secret Key link at the bottom of the
Sites area.
- Click Finish.