|
|
Online Help |
| Help Table of Contents |
Creating and Managing Email Messages in an Email Campaign
Use an email campaign to create and send email messages. A campaign helps you group related messages for easier identification and tracking. As part of message-creation process, you can evaluate your messages for spam, test the appearance of your message using various email providers, and test variants of your message.
When your message content is ready, configure the time (or future date and time) to send the message to the email delivery queue, set up the target audience, exclude groups that should not receive the message, and calculate the audience.
You can configure email messages for single-stage delivery or two-stage delivery:
- In single-stage delivery (the default), an audience is generated and an email message is sent in a single step.
- In two-stage delivery, the email audience is generated shortly after midnight on the day the mailing is scheduled to be sent.
How is a two-stage delivery helpful? Consider an instance when you schedule a message delivery on Monday afternoon to go out at 9 a.m. on Tuesday:
- With single-stage delivery, the audience is generated and the message sent at 9 a.m. on Tuesday. If you have a large mailing, the time it takes to generate the large audience list might delay the delivery significantly beyond 9 a.m.
- With two-stage delivery, the audience is generated hours before the delivery is set to start, typically shortly after midnight. The entire mailing is sent promptly at 9 a.m. You can use two-stage delivery for scheduled deliveries including campaign messages, quick email messages, and message variants.
To enable two-stage delivery, ask Convio Client Care to configure the EMAIL_DELIVERY_STAGING_ENABLED site option to TRUE. Two-stage delivery automatically occurs for all scheduled messages, including variants. Refer to Sending a Message for Delivery for more information.
Click a link to learn more about:
- Creating an Email Message
- Copying an Existing Message to Use as a Model
- Configuring the Message Delivery
- Sending a Message for Delivery
- Testing Variants of a Message for Effectiveness
- Previewing a Message
- Editing an Existing Message
- Archiving a Message
- Restoring a Message from the Archives
- Deleting a Message
- Displaying a List of Email Messages on the Web (opens a new topic)
- Working with Dynamic Email Preview (opens a new topic)
Creating an Email Message
Creating an email message for a campaign involves:
- Providing the Message Information
- Building the Message Envelope
- Selecting the Message Stationery
- Creating HTML Content
- Creating Plain Text Content
- Sending the Review Email
- Approving the Message
- Creating a Message Variant
You can also copy an existing message to use as a model and make changes to the details, envelope, and content. For assistance, refer to Copying an Email Message to Use as a Model.
After you create the message, you can configure the message delivery.
Providing the Message Information
Message details include naming the message, entering a description to help identify the purpose or intended audience of this message, and specifying the type of message so it can be grouped with similar ones.
In addition, you can set a tentative date when this message will be sent from the Email Delivery Queue. This information will be displayed on the email calendar, but can be changed when scheduling the actual delivery.
To provide the email message detail information:
- If the Campaign Summary page is not displayed for the email campaign under which the email message is to be created:
- From Email in the top navigation, click Email Campaigns. The Email Home page displays.
- Click the Campaigns tab. The Email Campaign List page displays.
- Click the Manage action for the appropriate campaign. The Campaign Summary page displays.
- From the Campaign Summary page, click Create a new message. The Message Information page displays.
Note: You can also create a new message from the Messages List page, which is displayed by clicking the Messages tab. - For Name, enter a descriptive label that will help identify this message to administrators browsing a messages list.
- For Description enter a phrase that will further help identify the purpose of this message to administrators.
- For Message Type , to associate this message with its purpose and group it with similar messages (for reporting), if the type:
- Exists, click Choose an existing value and select the appropriate option.
- Does not exist, click Enter a new value and type in the new type
- For Tentative Schedule Date, select Yes, specify a tentative schedule date and then select the date and time to send this message to the queue for sending.
Note: Specifying a schedule adds the scheduled date to your email calendar. - For Include this message in the message list, check the box if you would like to include this message in the publicly viewable message list.
Note: Using the WYSIWYG, you can place the Message List component on a web page and it will display all of the messages that you specify to include (once the messages have been approved and sent). Read more about the publicly viewable Message List in Displaying a List of Email Messages on the Web.
- For Select distributed email content request to associate with this message, select a content request you previously created in the Distributed Email Content module if you want to include distributed email content in this message. Refer to Managing Distributed Email Content for more information about Distributed Email Content.
- For Advocacy Alert, if the Advocacy application is installed, optionally click the name of the alert from the drop-down list to associate this message with the alert. (For more information, refer to Managing Action Alerts.)
- Duplicate Suppression (displays only if the appropriate site option is enabled), click Yes to be sure that only one message is sent to each constituent name/email address combination.
Note: If the system finds multiple constituents with the same First Name, Last Name, and email address combination, the message will be sent to the most recently registered one. - Click Next.
Building the Message Envelope
The Message Envelope identifies who is sending the message, the email address to which replies will be sent, and the subject of the message. Using a compelling subject line may entice more recipients to open your message. It is also important to be aware of using text that could be considered SPAM by the email service providers (for example, Hello There or Read this Immediately). You can run a SPAM report on your message subject and content later in this process flow.
You may also be able to insert a personalization code that adds the first name or both the first and last name to the subject line. You will also be able to specify the words to use if the name is not available (such as Friend).
To work with the message envelope:
- If the Message Envelope page is not displayed:
- From Email in the top navigation, click Email Campaigns. The Email Home page displays.
- Click the Campaigns tab. The Email Campaign List page displays.
- Click the Manage action for the appropriate campaign. The Campaign Summary page displays.
- Click the Messages tab. The Messages List page displays.
- Click Edit from the Actions column of the appropriate message. The Message Information page displays.
- Click Next.
- For Sender Name, enter the name to display in the From area of the email header and inbox of message recipients.
- For Sender Email Address, enter the email address to associate with the Sender Name in the From area of the email header and inbox of message recipients.
Note: To avoid deliverability issues, do not enter an @yahoo.com or @aol.com email address. For more details, refer to the Yahoo DMARC policy. - For Reply-To Email Address, enter the email address where replies to the message will be sent. The Sender Email Address is used by default when this field is empty.
- For Message Subject, complete the following steps:
- Enter the phrase to display in the Subject area in the email header and inbox of the message recipients.
- (Optional) Personalize the subject line by adding the recipient’s name:
- Click the appropriate choice from the Personalization Option drop-down list (such as First Name). A User Prompt page displays.
- Enter a word or phrase (such as, Friend or Valued Constituent) as the alternative text to display if the option selected is not available
- Click OK.
- Click Next.
Tip: if you do not see the prompt, you may need to enable scripted windows.
Selecting the Message Stationery
The stationery controls the elements that display in the top, bottom, left, and right margins of the message and must be created in advance. For more information, refer to Managing Stationery.
To select the stationery for the message:
- If the Stationery page is not displayed:
- From Email in the top navigation, click Email Campaigns.
- On the Email Home page, click the Campaigns tab.
- On the Email Campaign List page, click the Manage action for the appropriate campaign.
- On the Campaign Summary page, click the Messages tab.
- On the Messages List page, click Edit in the Actions column of the appropriate message.
- On the Message Information page, click Next.
- On the Message Envelope page, click Next.
- Click the appropriate stationery and click Next. The HTML Content page appears.
Creating HTML Content
Typically you will type your HTML content or paste it from another source. By default, the WYSIWYG Editor appears so that you can enter content and then format it using the tools on the Editor toolbar. You can easily change the font type, size, or color; make text display in bold, italics, or underlined; add a background color to highlight specific text. You can also create bulleted and numbered lists, align text blocks, and insert tables.
You can insert images, links to other pages within or external to your site, and Convio components to display information about site activities, personalize certain content to make it friendly, or add conditionals to display certain content to specific constituents under defined conditions. For details about using these tools, refer to Using the WYSIWYG Editor.
You can switch from the WYSIWYG Editor to the Plain Text Editor to view the HTML formatting and Convio coding that is in the content or you can paste HTML source code directly into this window and then switch back to the WYSIWYG Editor to view it.
If you plan to update your HTML content, you may need to keep track of changes you have made in the converted plain text because the conversion overwrites previous changes if you click Convert to Plain Text a second time. This means you will have to make all of your changes again unless you make your changes manually without clicking Convert to Plain Text again.
Notes:
- If you copy prepared content from another source and paste it into the WYSIWYG Editor, invalid HTML or other formatting may not be copied correctly and may need to be reformatted. If the Paste from Word tool is not available, this may happen.
- Do not embed a survey in an email message; instead, create a link to the survey. For assistance, refer to the Managing Surveys.
To enter content in the message:
- If the HTML Content page is not displayed:
- From Email in the top navigation, click Email Campaigns. The Email Home page displays.
- Click the Campaigns tab. The Email Campaign List page displays.
- Click the Manage action for the appropriate campaign. The Campaign Summary page displays.
- Click the Messages tab. The Messages List page displays.
- Click Edit from the Actions column of the appropriate message. The Message Information page displays.
- From the navigation options on the left side of the page, click HTML Content.
- On the HTML Content page, enter your content, or paste it in from another source. Use the full features of the WYSIWYG to enter and format text; apply styles, incorporate background colors; insert images, tables, links, and contact information; add personalization and other Convio components. For more information, refer to Using the WYSIWYG Editor.
Notes:
(1) We do not recommended that you embed a survey in an email message; instead create a link to the survey. For assistance, refer to the Managing Surveys.
(2) If you have selected a custom stationery, be sure the stationery contains an unsubscribe link. You can easily add the link now at the end of the message by entering and then selecting appropriate text, clicking Links, selecting Browse Convio Links, selecting Email, clicking Unsubscribe, and then clicking Insert.
(3) As you work with the message content, click Save to keep from losing any work. - After you enter and save content, click Preview to check how the message will look to your recipients. You can choose to view the message as:
- The administrator (that is, with your current administrative login). This is a standard administrative preview and opens by default.
- An Individual Constituent of your choosing. This preview will permit you to test your message for any conditionals or personalization you have added.
To preview as an individual constituent:
- Click Individual Constituent at the top of the Preview area.
- Click Select a Constituent.
- Type search terms (such as a First and Last Name) to locate the constituent of your choice.
- Click Search. A list of constituents who satisfy your search terms displays.
- In the list of constituents who satisfy your search, select a constituent.
Your email appears as that individual will see it: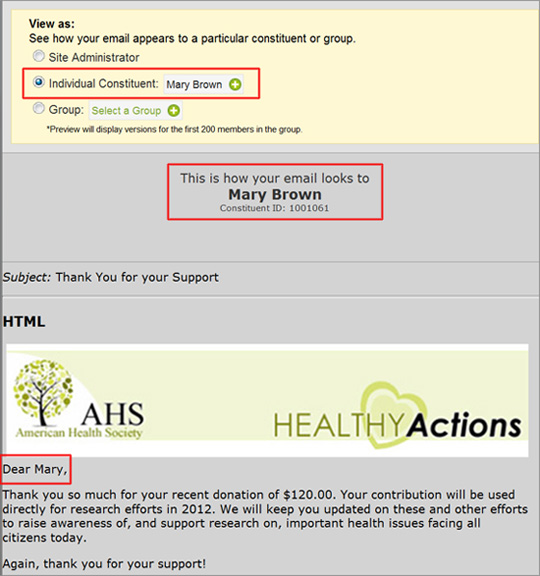
- As a member of a Group of your choosing. You will be able to "page through" the members of the group to see what each member would see—and more thoroughly test the personalized and conditional content in the message.
To preview how members of a group will see your email:
- Click Group at the top of the Preview area.
- Click Select a Group. The Dynamic Content Group Picker displays.
- Click on the Group Type that you would like to preview (for example, Special Donor).
- Click on the specific Group of that type to select it (for example, Spring Donors).
- Click Save. The pop-up closes and you will see the email as the first member of that group would see it.
- Use the Previous Constituent and Next Constituent arrows to page through the group and see how additional members will see the message:
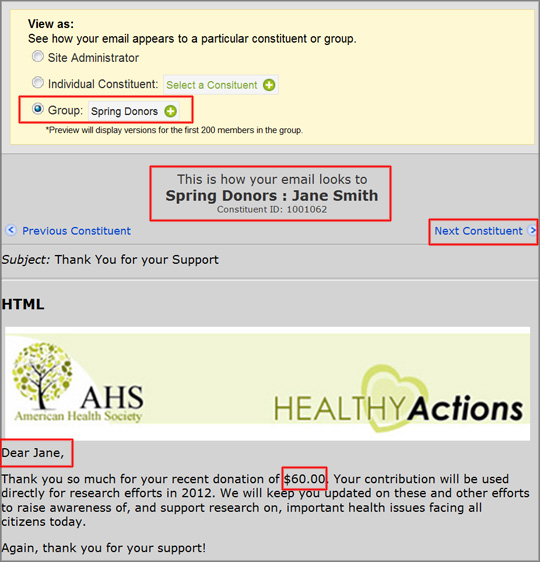
Note: If you are using Multiple Locale support, you will see the message for each constituent according to the preferred locale for that constituent.
- When you are finished, close the Preview window, make any changes, and repeat the previous steps.
- When you are satisfied, click Next.
Creating Plain Text Content
After you enter the HTML content, click Convert to Plain Text to strip out the HTML formatting, tags, and images for recipients who do not accept HTML-formatted email. You can see the URLs to links and Convio components appear as session tags with embedded IDs. These items resolve correctly in the message that recipients get; however, you might need to adjust the spacing around or introduction to these items so they make sense to the recipients.
Note: You can enter HTML formatting directly in the Plain Text Editor.
- On the Plain Text Content page, click Convert to Plain Text.
- Review the message and make necessary changes such as adding or removing space around words or adding introductory text to links.
WARNING: If you subsequently make changes to the HTML content on the previous page, make the same changes manually in the Plain Text content area. If you click Convert to Plain Text again, the system overwrites changes you previously made in the Plain Text version. - When you finish making changes, click Save.
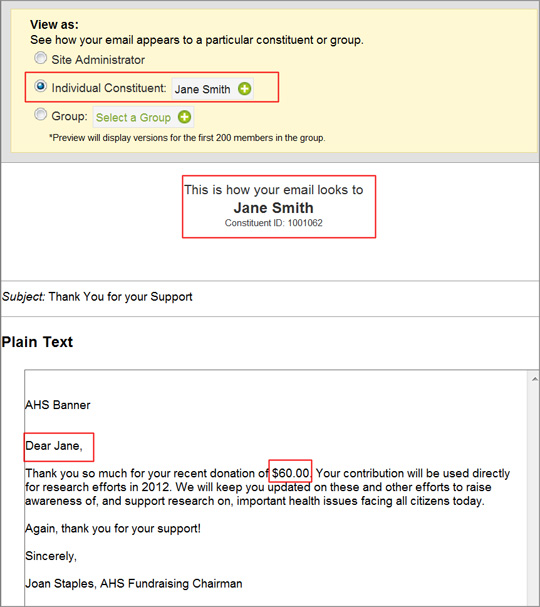
- After you review and save the plain text version of your message, click Preview at the bottom of the page to check how that version of the message will look to your recipients. You can choose to view the plain text version of your message as:
- The administrator; that is, with your current administrative login. This preview opens by default.
- An Individual Constituent of your choosing. This preview will permit you to test your message for any conditionals or personalization you have added.
- A member of a Group of your choosing. You will be able to page through the members of the group to see what each member would see and more thoroughly test the personalized and conditional content in the plain text version of the message.
- Click Individual Constituent at the top of the preview area.
- Click Select a Constituent.
- In the Choose a Constituent box, type search terms in one or more of the boxes to locate a constituent.
- Click Search.
- In the constituent list, click the constituent's name. The plain text version
of your email appears as that individual will see it:
- Click Group at the top of the preview area.
- Click Select a Group.
- In the Dynamic Content Group Picker box, select the Group Type that you want to preview (for example, Special Donor).
- Select the specific type (for example, Spring Donors).
- Click Save.
- Click Previous Constituent and Next Constituent to page through the group and see how additional members will see the message.
- When you finish previewing, close the Preview window, make changes to the plain text email if necessary, and repeat the previous steps.
- When you are satisfied with the plain text version, click Next.
To preview how members of a group will see the plain text version of your email:
Sending the Review Email
To test whether your intended recipients will receive the message, perform one or more of the following validation tasks:
- Run the message against the spam checker to determine whether it will be marked as spam by popular email service providers such as Microsoft Exchange, Gmail, Yahoo!Mail, and AOL. The spam report provides a score and identifies potential problems and resolutions.
- Send the message to your test accounts in the various email service providers to determine whether intended recipients can receive the message and the message displays correctly. You must have the test accounts set up in advance of testing.
- Send the message for evaluation and approval by an Audience Reviewer List that you set up for the email campaign. For more information, refer to Creating the Target Audience for an Email Campaign.
- Preview across email clients by using the Email on AcidTM widget to test sending to desktop, mobile, and web email applications and previewing the message as it will appear in the selected applications.
For more information about using the Email on Acid widget, refer to Using the Email on Acid Widget.
Note: If you need more tests, contact your Account Manager to set up a monthly usage contract.
To run the spam checker:
- Click Report. After a few seconds, the spam report appears in a separate browser window.
- Read through the information and close the report page.
- Make the suggested changes to your email and repeat the test.
- When you are finished, close the report page.
To test that the message is properly formatted and can be received through the popular email service providers:
- In the Test the message area, enter your test account email addresses separated by commas or put each address on a separate line.
- To receive both the HTML-formatted and Plain text-formatted content at each address, click Send a separate plain-text copy to my test email addresses.
- To send the test message to an individual recipient or a group member, which allows you to test the conditional text and personalizations in your message, click Viewing as and then select one of these options:
- Leave the default System Administrator selection to preview as the logged-in System Administrator.
- Click Change, click Select a Constituent, and then search for an select a specific constituent.
- Click Change, click Select a Group, and then navigate to and select a group. You will see the message as one of the group members.
- Click Send Tests.
- After a few moments, open the test accounts to receive and review the emails.
Note: When you receive your test emails as an individual constituent or as a group member, the subject line includes the constituent's name: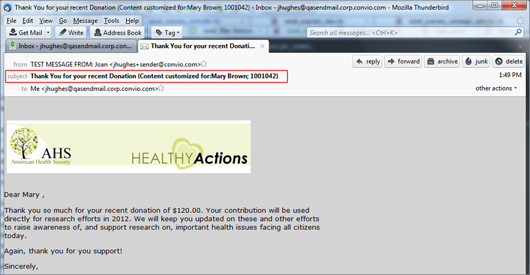
- Make necessary changes and repeat these steps as necessary.
To send the message to the Reviewer List for approval and comments before sending it to the target audience:
- To set up the Reviewer list:
- On the left, click Audience.
- On the Reviewer List page, click Add Groups.
- On the Select Groups page, select the reviewer groups you want to include.
- Click Finish.
- Click the Messages tab at the top.
- On the Message List page, click Edit in the Actions column for your message
- On the Message Information page, click Send Review Email on the left.
- On the Send Review Email page, navigate to the Send this message to the Reviewer List step.
- To send the message to the Reviewer List, click Send Tests.
- If you are not waiting for reviewers to respond with comments, click Next to approve the message.
Note: If you are waiting for reviewers to respond with their comments, you can leave this page or minimize it. Your message will be saved as a Draft in the Messages List for this campaign. After you gather the review comments, you can return to the Messages List and edit this message to fix errors. If you leave this message and have no additional edits to make, you can approve the Draft directly from the Message List at any time.
Approving a Message
The next step in the message creation flow is to approve it and then configure delivery to your target audience.
If you are not in the message creation flow (for example, you have closed the application while waiting for reviewer comments) and do not need to make any edits to it, you can approve the Draft directly from the Message List.
To approve the message on the Approve page:
- If the Approve page is not displayed:
- From Email in the top navigation, click Email Campaigns. The Email Home page displays.
- Click the Campaigns tab. The Email Campaign List page displays.
- Click the Manage action for the appropriate campaign. The Campaign Summary page displays.
- Click the Messages tab. The Messages List page displays.
- Click Edit from the Actions column of the appropriate message. The Message Information page displays.
- From the navigation options on the left side of the page, click the Approve step.
- Click Approve. The screen refreshes and indicates that the message is being moved from the Draft state to the Approved state. You can now schedule delivery or go on to other tasks as discussed below.
- To continue by:
- Saving this approved message but not configuring its delivery, click Finish. The Message List page displays with Approved (never sent) as the status of this message.
- Configuring the delivery options for this message and sending it to the delivery queue, click Set Up Delivery. The Configure Message Delivery page displays.
Important: The Approval page also contains the URL of the Message (Step 3 after the message is approved). You can use this URL to make this message available on a web page. Copy and paste the URL into your browser to see what the message will look like to your constituents when viewed on a Web pag).
Creating a Message Variant
After you approve a message, you can optionally run a variant test (also called an A/B test) on a specific part of the message (for example, the subject line or a paragraph within the content) and send it to a sampling of your audience so you can review its effectiveness before sending it out to your entire target audience.
To send two different versions that contain a small change in one message item to a sampling of your target audience to determine which elicits the better response, click Create a new Variant on the left. For assistance, refer to Creating a Variant A/B Test.
Configuring Message Delivery
When you are ready to configure delivery of the message, you should review the default delivery information to be sure the message will be sent to the message delivery queue immediately or on the correct date, and that the Target List and Do Not Mail List groups are appropriate.
Sending a message immediately means that it will be sent to the message delivery queue, but it may actually leave the queue later if there are other jobs in front of it or your site has an agreement to release large email jobs at certain times to avoid disturbing normal daytime activities or causing system performance issues.
Configuring the delivery for a message may include selecting the target audience groups who will be the recipients, selecting groups and applying filters to be sure it is sent only to the appropriate members of the target groups, and sending carbon copies to recipients who have both a primary and secondary email address listed in their contact record. You can check your configuration by calculating the number of messages that will be sent to the audience when all of your options have been applied.
After you have configured the delivery, you can send it to the queue to be delivered to the intended recipients -- immediately or on the date/time scheduled.
The message configuration options, which you select using the Related Actions on the Configure Message Delivery page, include:
- Scheduling the Delivery to a Future Time and Date if the message is not being placed in the queue for Immediate delivery or the time/date needs to be updated
- Selecting the Target Audience Groups to Receive the Message if this has not been done or you must add more groups
- Selecting Do Not Email Groups to Remove Members of the Target Audience who should not receive this message (for example, to keep from sending this message to someone who has already performed the interaction associated with it)
- Selecting Groups to Rebuild Before the Message Leaves the Delivery Queue if there are rebuildable groups that may contain new members as the result of a query or task that has run since the message was queued
- Selecting Delivery Filters to Apply Special Conditions if multiple messages have been sent from the campaign already
- Selecting Advocacy Filters to Apply Political Conditions for selecting the appropriate recipients from within the target audience
- Selecting Delivery Options to to send out a plain text content version only instead of both the HTML and plain text-formatted versions of the message, and to send a carbon copy of the message to secondary email addresses
- Calculating the Number of Recipients in the Target Audience to be sure you have selected the best options and groups before you send this to the queue
If you do not have the Configure Message Delivery page displayed, refer to the next section.
Displaying the Configure Message Delivery Page
To configure the delivery schedule and other options, you can display the Configure Message Delivery page in several different ways:
- Approve Message page (in the Create Message flow), click Set up Delivery.
- Or, Message List, click Set Up Delivery from the Actions column of the appropriate message.
- Or, Related Actions on the Campaign Summary or Message List page, click Send a message and then click Set up Delivery from the Actions column of the appropriate message.
Scheduling the Message Delivery for a Future Time and Date
If you do not want to send the message immediately to the email delivery queue, or if you intended to use two-stage delivery, you can schedule the date and time that the message should go to the queue to be sent out to the appropriate recipients. You can schedule just a future time as well.
Sending the message to the email delivery queue places it in the queue where it will be sent at the next available interval according to the rules and tasks for emailing on your site. The actual send process also depends on the contention for resources on your site.
To schedule a recurring delivery for a message, refer to Setting Up a Recurring Delivery Schedule.
On the Configure Message Delivery page, if the Schedule status message contains a date and time (or time) that must be adjusted:
Note: If the Configure Message Delivery page is not displayed, click here.
- From Related Actions, click Schedule. The Select Date and Time page displays.
- Use the date and time drop-downs to select the appropriate date and time and then click Finish. The Configure Message Delivery page displays again.
Selecting the Target Audience Groups to Receive the Message
Each message will automatically pick up the audience that has been configured for the campaign. However, you can add or remove groups of constituents when you set up the delivery options for each individual message within the campaign.
If there are members in a selected group who should not be sent the message (for example, they have already performed the interaction associated with the message), you can exclude them from the mailing without disturbing their membership. Refer to Selecting Do Not Email Groups to Remove Members of the Target Audience
If you need to create a group in order to have specific constituents listed in it, refer to Creating and Working with Groups.
To add a group of recipients to the Target Audience Groups who should receive the message:
Note: If the Configure Message Delivery page is not displayed, click here.
- From Related Actions on the Configure Message Delivery page, click Select Target Audience Groups. The Select Audience page displays.
- Click the appropriate group type and then click the specific group from the options displayed. The selected group displays in the Selected area (on the right side of the page).
Note: To remove a group, place your cursor over the group in the Selected area and click the X in the upper right corner. - Click Next. The Select groups to exclude from the mailing page displays. You can continue with selecting the groups to exclude and rebuild or click Cancel to return to the Configure Message Delivery page.
Selecting Do Not Email Groups to Remove Members of the Target Audience
You can select groups that should not be sent this email message.
To select groups to exclude from receiving this message:
Note: If the Configure Message Delivery page is not displayed, click here.
- From Related Actions on the Configure Message Delivery page, click Select Do Not Email Groups. The Select groups to exclude page displays.
- Click the appropriate group type and then click the specific group from the options displayed. The selected group displays in the Selected area (on the right side of the page).
Note: To remove a group, place your cursor over the group in the Selected area and click the X in the upper right corner. - Click Next. The Rebuild Target Groups page displays. Select the groups to rebuild or click Cancel to return to the Configure Message Delivery page.
Selecting Groups to Rebuild Before the Message Leaves the Delivery Queue
Groups whose memberships are automatically updated by queries or tasks that run at certain intervals on your site are considered rebuildable. Most groups are manually updated or updated through import (or DataSync) operations and are not considered rebuildable to catch updates.
For more details, refer to Rebuilding Groups.
To specify if a rebuildable group should be rebuilt before the message is sent:
Note: If the Configure Message Delivery page is not displayed, click here.
- From Related Actions on the Configure Message Delivery page, click Select Group Rebuild Options. The Group Rebuild page displays.
- Click the appropriate checkboxes.
- Click Finish. The Delivery Details page displays.
Selecting Audience Filters to Apply Special Conditions
To apply filters to include or exclude members from your audience groups based on prior interactions with emails sent from this campaign:
Note: If the Configure Message Delivery page is not displayed, click here.
- From Related Actions on the Configure Message Delivery page, click Select Delivery Filters. The Audience Filters page displays.
- Click the appropriate checkboxes.
- Click Finish. The Delivery Details page displays.
Selecting Advocacy Filters to Apply Political Conditions
If you have the Convio Advocacy application installed, you can make certain selections to restrict sending a message to certain constituents based on legislator actions. For example, you can restrict sending a message to only constituents whose legislators took a certain position on a vote or those whose legislators are members of a specific party or Congressional committee.
To add the Advocacy filters to further refine who will receive the message:
Note: If the Configure Message Delivery page is not displayed, click here.
- From Related Actions on the Configure Message Delivery page, click Select Advocacy Filters. The Advocacy Filters page displays.
- Click the appropriate checkboxes. For details, refer to Managing Advocacy.
- Click Finish. The Delivery Details page displays.
Reviewing and Setting Miscellaneous Delivery Options
You may not want to send your message in HTML format. Further, you may want to send your message both to primary and secondary email addresses. To configure these options:
Note: If the Configure Message Delivery page is not displayed, click here.
- From Related Actions on the Configure Message Delivery page, click Select Delivery Options. The Delivery Options page displays.
- Click the Send plain text format only checkbox if you do not want to deliver email in HTML format.
- Click the CC all recipient email addresses checkbox to send an additional copy of the message to any secondary email address in the contact records for the target audience.
- Click Finish. The Delivery Details page displays.
Calculating the Number of Recipients in the Target Audience
To determine if your message will reach most of your target audience, use the Calculate Audience Recipients feature. If too many recipients have been filtered out, you can fix the filters before you send the message.
To calculate the audience recipients:
Note: If the Configure Message Delivery page is not displayed, click here.
- From Related Actions on the Configure Message Delivery page, click Calculate Audience Recipients. The Determine Audience Size page displays.
- Click Calculate Audience Recipients. The Delivery Details page displays with new information and statistics that show the number of target recipients who are filtered out and overlap between groups for the actual useable email addresses of the audience, target group breakdown, and the filters applied.
- If the calculations:
- Are acceptable and you want to send the message, click Next. The Ready to Send to Delivery Queue page displays.
- Are not what you expected, click the appropriate link from the Related Actions to modify the audience groups and filters as necessary and then return to this step.
Sending the Message for Delivery
After you have configured its delivery, you can send the message to the email delivery queue to be delivered to the intended recipients immediately or on the date/time scheduled.
To send the message to the email delivery queue:
Note: If the Configure Message Delivery page is not displayed, click here.
- On the Configure Message Delivery page, click Next. The Send to Delivery Queue page displays.
- On the Ready to Send to Delivery Queue page, click Send. The message is placed in the queue to be sent immediately or at the selected date and time. If you are using the two-stage message delivery feature, in the list of email deliveries, a two-stage message will display as Scheduled under Status. Refresh the page by pressing F5. After the system generates the audience to whom the message will be sent, a message will display at the top of the page, Audience for this delivery has been generated and cannot be changed, and Audience Generated will display for a two-stage message under Status.
Note: The actual Send process depends on the tasks and rules set up for your site and may also depend on resource contention.
Testing Variants of a Message for Effectiveness
To maximize the effectiveness of an email message, you can create another version of the message where you vary the words in one of the message elements, and then send the original message to a sample audience (referred to as A) and the variant to a different sample audience (referred to as B). Then, you will run a report to determine which version is more effective by how many people opened each message, how many people clicked through the action link in the message, how many people took the action in the message, and so on.
You can change wording in the message envelope or content. You can also use a different stationery.
For the most accurate results, change only one element at a time in a message variant.
You can test an approved message variant even if the original message has not been approved yet.
Notes:
(1) You can also conduct an A/B Test on the original message to sample an audience or the response to the message without creating the variant element.
(2) To view an introductory movie about using variants, use the Click here to view introduction link located below the Message List.
Click one of the following links to learn more about:
Creating a Variant A/B Test for a Message
To test an entity in a message, you can change the:
- Envelope by changing the Sender Name or Subject line. For example, if the original message envelope is from the organization, you can try using the name of a specific administrator as the variant. Or, if the original message subject contains the First Name personalization option, you can test a variant that does not contain it.
- Stationery specified in the original by selecting an alterate stationery.
- Content in some way. For example, you can test the strength of two different opening lines; or send one message with a picture inserted and one without (or, change the picture location). Or, you can change the color and appearance of a link to an action.
For the most accurate results, change only one element at a time in a message variant.
You can test an approved message variant even if the original message has not been approved yet.
To create a message variant:
- If the Message Variants page is not displayed:
- From Email in the top navigation, click Email Campaigns. The Email Home page displays.
- Click the Campaigns tab. The Email Campaign List page displays.
- Click the Manage action for the appropriate campaign. The Campaign Summary page displays.
- Click the Messages tab. The Messages List page displays.
- Click Edit from the Actions column of the appropriate message. The Message Information page displays.
- From the navigation options on the left side of the page, click Create a New Variant.
- In the Name field, enter a label for this message variant that will help identify the element being altered and then click Next. The message Envelope page displays.
- To change the:
- Sender Name that will display to recipients in the From area of this message when it is in their inbox, enter the new name in the Sender Name field and click Save.
- Sender Email address that will display to recipients in their inbox, enter the new address in the Sender email address field and click Save.
- Message Subject that will display to recipients in their inbox, enter the new subject line in the Subject field and click Save.
- Personalization option (First Name, Last Name, or both) that will display in the subject line, select a new option from the Select Personalization Option drop-down list and click Save. Note: To remove the option completely in the variant, click Select Personalization Option.
- Stationery used to control the elements around the top and sides of the message content, click Next, click a different Stationery option and click Save.
- Content words or formatting (or to remove or insert a picture, and so on):
- Click HTML Content and make your change. Use the full features of the WYSIWYG to enter and format your content; apply styles, incorporate background colors; insert images, tables, links, and contact information; and add personalization and other Convio components. For more information, refer to Using the WYSIWYG Editor.
Notes: (1) Changes you make in this Editor you must manually make in the plain text area on the next page to avoid overwriting any changes already made in that editing area. A step for this is included below, but you should note and keep track of any changes so you do not forget them.
(2) If the change you want to make is only to the plain text content (for example, to present a link in a different way or move it), you can skip to Step d below. - As you work with the message content, click Save.
- When you have entered and saved content, click Preview to check how it will look to your recipients. A separate window opens and displays the message.
Important: You can choose to View the message preview as an individual constituent or as members of a group would see it—just as you could when creating the original message. This will help you check the personalization and conditionals in the message variant.
- When you are finished, close the Preview window, make any changes, and repeat the previous steps.
- When you are satisfied, click Next. The Plain Text page displays.
- Carefully make (or copy) the changes you made into the plain text area. You can also preview these changes as an individual constituent or as members of a group would see them.
- Click Save.
- Click HTML Content and make your change. Use the full features of the WYSIWYG to enter and format your content; apply styles, incorporate background colors; insert images, tables, links, and contact information; and add personalization and other Convio components. For more information, refer to Using the WYSIWYG Editor.
- To send a test copy of the variant message to yourself:
- Click Next. The Send Review Email page displays.
- In the Send Yourself a Test area, enter your test account email addresses. You can separate the addresses by commas or put each address on a separate line.
- To receive both the HTML-formatted and plain text-formatted content at each address, click the Send a separate plain-text copy to my test email addresses checkbox.
- Choose whether to receive your test emails as the:
- Administrator (the default)
- Individual Constituent (and then select the constituent)
- Members of a Group (and then select the Group)
- Click Send Tests.
- After a few moments, open the test accounts to receive and review the emails.
- Make any necessary changes to the variant message and repeat the steps above until you are satisfied.
- To send the variant message to reviewers for approval and comments before sending it to the target audience, click Send (under Step 3).
- To continue, if you:
- Are not waiting for reviewers to respond with comments, click Next. The Approve Message page displays.
- Are waiting for reviewers to respond with their comments, you can leave this page (or minimize it). Your message will be saved as a Draft in the Messages List for this campaign. When you have gathered the review comments, you can return to the Messages List and edit this message to fix any errors.
Note: If you leave this message now and do not have any additional edits to make, you can run the variant A/B test directly from the Message List.
Sending the Original and Variant Message of an A/B Test
Although you determine the size of the audience subset to which the variants are sent by specifying an exact number or a percentage of the audience to sample, the system randomly selects the recipients from your Target List.
After you run the A/B test, you can analyze the results through the Variant Performance Report to determine which message to send to the remainder of your audience.
To send the original and variant messages of an A/B Test to the sample audiences:
- If the A/B Test Setup page is not displayed:
- From Email in the top navigation, click Email Campaigns. The Email Home page displays.
- Click the Campaigns tab. The Email Campaign List page displays.
- Click the Manage action for the appropriate campaign. The Campaign Summary page displays.
- Click the Messages tab. The Messages List page displays.
- From Related Actions, click Run an A/B Test.
Note: You may also click A/B Test in the Actions column of the appropriate message in any messages list displayed on a page. - Click A/B Test in the Actions column of the appropriate message. The A/B Test Setup page displays.
- To define the number of recipients from the Target List who should receive the variant:
- Type in:
- A Sample Percentage (such as, 10 or 15)
- A Sample Number (100 or 250)
- Type in:
- Click Next. The Review page displays.
- To change the send time to a specific time and date:
- Click Schedule from the Related Actions area.
- Select the appropriate date and time by clicking on the drop-down menus. Note that this new time and date does not take affect until you click Start in a later step.
- Click Finish to return to the Review page.
- If you want to change the Target Audience Groups who should receive the variant:
- Click Select Target Audience Groups in the Related Actions area.
- Select any Groups you would like to add. Conversely, hover your mouse over any selected groups and then click the X to Remove any unwanted Groups.
- Click Finish to save your changes and return to the A/B Setup page.
- If you want to change the constituents who should not receive the message:
- Click Do Not Email Groups in the Related Actions area.
- Select or remove groups as discussed in the previous step.
- Click Finish to save your changes and return to the A/B Setup page.
- To specify if the groups should be rebuilt when the messages are sent:
- Click Select Group Rebuild Options in the Related Links area.
- Click the appropriate checkboxes to schedule rebuilding.
- Click Finish to return to the A/B Setup page.
- Click Next. The Start page displays.
- Click Start. The Delivery List page displays again with the The A/B Test has been created message at the top of the page.
After confirming that the messages have been sent, you can run the Variant Performance Report to determine which message (the original or the variant) was opened more often or had the most clickthroughs to your site, and so on.
Approving a Message from the Message List
If you created the message but waited before approving it, you can approve it directly from the messages list and configure its delivery.
To approve your message from the Message List page: Click Approve from the Actions column of the message. Return to Draft displays in the Actions column and the message is now ready to send. (Note that you will no longer be able to Edit the message unless you click Return to Draft.)
If the Messages List page is not displayed:
- From Email in the top navigation, click Email Campaigns. The Email Home page displays.
- Click the Campaigns tab. The Email Campaign List page displays.
- Click the Manage action for the appropriate campaign. The Campaign Summary page displays.
- Click the Messages tab. The Messages List page displays.
Next, if you want to:
- Conduct an effectiveness test before sending the message to the full audience, you can create a variant for A/B testing.
- Send it to the target audience, you can configure delivery options and send the message.
Creating a Message by Copying an Existing Message
You can create a new message by copying an existing one to use as a model and then editing it to change the message information (name, stationery, and so on) as well as the content and delivery options.
To copy an existing message:
- If the Message List page is not displayed:
- From Email in the top navigation, click Email Campaigns. The Email Home page displays.
- Click the Campaigns tab. The Email Campaign List page displays.
- Click the Manage action for the appropriate campaign. The Campaign Summary page displays.
- Click the Messages tab. The Messages List page displays.
- Click Copy from the Actions column of the appropriate message. The Confirm Copy page displays.
- For Name, enter a new label for this message that will help other administrators identify the purpose of this message or to distinguish it from other messages in the list.
- For Purpose, enter a phrase to further identify or distinguish this message.
- Click Confirm Copy. The Message List page displays showing the new message with Draft as its Status.
You can edit the message.
Previewing a Message
You can preview an email message to see what it looks like before approving and sending it or before copying it to use as a model for a new message.
To preview an existing email message, click Preview from its Actions column on the Message List page.
If the Message List page is not displayed:
- From Email in the top navigation, click Email Campaigns. The Email Home page displays.
- Click the Campaigns tab. The Email Campaign List page displays.
- Click the Manage action for the appropriate campaign. The Campaign Summary page displays.
- Click the Messages tab. The Messages List page displays.
- Click the Preview action for the appropriate message.
Editing a Message
You can edit the email message information (that is, the name, envelope, stationery, and so on) as well as the message content to make changes to the existing message.
If the message has been approved, you must return it to Draft before you can edit it.
You should always validate your message again after you make changes to it to be sure it looks the way you intended.
Click one of the following links to learn more about:
- Returning an Approved Message to Draft Status for Editing
- Editing the Name or Description of a Message
- Editing the Type of a Message
- Adding or Changing the Advocacy Alert Associated With a Message
- Editing the Sender Information for a Message
- Editing the Subject Line Displayed In a Message (includes the personalization option)
- Changing the Stationery for a Message
- Editing the Content of a Message
Returning an Approved Message to Draft Status for Editing
If a message has been approved, you must return it to draft status so you can edit it.
To return a message to Draft status: Click Return to Draft from its Actions column in the Messages List.
If the Message List page is not displayed:
- From Email in the top navigation, click Email Campaigns. The Email Home page displays.
- Click the Campaigns tab. The Email Campaign List page displays.
- Click the Manage action for the appropriate campaign. The Campaign Summary page displays.
- Click the Messages tab. The Messages List page displays.
- Click the Return to Draft action.
If an error message displays that informs you scheduled deliveries are pending, you can cancel the pending deliveries if offered on the page that displays, and then click Return to Draft again, or copy the message and make your changes in the new version.
Editing the Message Name or Description
You can change the name or description of a message to add or delete words, correct typographical errors and so on. The Name and Description of a message can help other administrators identify the purpose, content, and intended audience of the message.
To edit the name or description of a message:
- From the Message List, click Edit from its Actions column in the Messages List.
If the Message List page is not displayed:- From Email in the top navigation, click Email Campaigns. The Email Home page displays.
- Click the Campaigns tab. The Email Campaign List page displays.
- Click the Manage action for the appropriate campaign. The Campaign Summary page displays.
- Click the Messages tab. The Messages List page displays.
- Click the Edit action for the appropriate message.
- Enter your changes to the Message Name. This label helps identify the purpose of this message to administrators who are browsing the Message List.
- Enter your changes to the Message Description. This phrase helps identify the purpose, content, and recipients of this message to administrators browsing a messages list.
- Click Save. Your changes are saved.
Adding or Changing the Message Type
You can add or change the type of a message to group it with other similar messages.
To add or change the type of a message:
- From the Message List, click Edit from its Actions column in the Messages List.
If the Message List page is not displayed:- From Email in the top navigation, click Email Campaigns. The Email Home page displays.
- Click the Campaigns tab. The Email Campaign List page displays.
- Click the Manage action for the appropriate campaign. The Campaign Summary page displays.
- Click the Messages tab. The Messages List page displays.
- Click the Edit action for the appropriate message.
- For the Message Type, to group this message with a type that:
- Is defined, click the Choose an existing value drop-down list and click the appropriate choice.
- Does not yet exist, click Enter a new value and enter a new type in the field displayed.
- Click Save. Your changes are saved.
Adding or Changing the Advocacy Alert Associated with a Message
If you have the Advocacy application installed, you can associate this message with a specific action alert or change the previous association.
The alert must already be Published.
To add or change the action alert with a message:
- From the Message List, click Edit from its Actions column in the Messages List.
If the Message List page is not displayed:- From Email in the top navigation, click Email Campaigns. The Email Home page displays.
- Click the Campaigns tab. The Email Campaign List page displays.
- Click the Manage action for the appropriate campaign. The Campaign Summary page displays.
- Click the Messages tab. The Messages List page displays.
- Click the Edit action for the appropriate message.
- Click the Advocacy Alert drop-down list and select the appropriate alert.
- Click Save. Your changes are saved.
Editing the Sender Information for a Message
You can change the name of the person listed as the sender of the message as well as the email address to which replies to the message will be emailed.
To change the sender information of a message:
- From the Message List, click Edit from its Actions column in the Messages List.
If the Message List page is not displayed:- From Email in the top navigation, click Email Campaigns. The Email Home page displays.
- Click the Campaigns tab. The Email Campaign List page displays.
- Click the Manage action for the appropriate campaign. The Campaign Summary page displays.
- Click the Messages tab. The Messages List page displays.
- Click the Edit action for the appropriate message.
- From the navigation steps along the left, click Envelope (or Next if the Message Information page is displayed). The Message Envelope page displays.
- In the Sender Name field, make your change to the name that will display in the From area in the recipient email inbox and message.
- In the Sender Email field, make your change to the email address to which replies to this message will be sent.
- Click Save. Your changes are saved.
Editing the Subject Line in a Message
You can add, delete, or change the words in the Subject line that is displayed to email recipients in the Inbox. If this line also contains a personalization option (such as the first and last name of the message recipient), you can alter this or add information to it.
Using a compelling subject line may entice more people to open the email. Note that the Subject line is checked for potential SPAM characteristics when you run the SPAM report in the Validating and Testing step before approving a message for distribution.
The personalization options are added using the Personalization drop-down list. You can choose to add just the first name or both the first and last name of the message recipient. You are also prompted to add an alternate greeting word (such as Friend or Valued Constituent) that will be inserted if the name is not available.
To edit the subject line of a message:
- From the Message List, click Edit in the Actions column of the appropriate message.
If the Message List page is not displayed:- From Email in the top navigation, click Email Campaigns. The Email Home page displays.
- Click the Campaigns tab. The Email Campaign List page displays.
- Click the Manage action for the appropriate campaign. The Campaign Summary page displays.
- Click the Messages tab. The Messages List page displays.
- Click the Edit action for the appropriate message.
- From the navigation steps along the left, click Envelope (or Next if the Message Information page is displayed). The Message Envelope page displays.
- In the Subject field, make your changes.
- For personalization:
- Click the appropriate option from the Personalization drop-down list. A prompt displays in a pop-up window near the top corner of your desktop (be sure you have pop-ups or scripted windows enabled).
- Enter an alternate greeting word to insert if the name option selected is not available and click OK. The pop-up closes.
- Click Save. Your changes are saved.
Changing the Stationery for a Message
The stationery controls the elements that display in the top, bottom, left, and right margins of the message and must be created in advance. For more information, refer to Managing Stationery.
To change the stationery for the message:
- From the Message List, click Edit in the Actions column for the appropriate message.
If the Message List page is not displayed:- From Email in the top navigation, click Email Campaigns. The Email Home page displays.
- Click the Campaigns tab. The Email Campaign List page displays.
- Click the Manage action for the appropriate campaign. The Campaign Summary page displays.
- Click the Messages tab. The Message List page displays.
- Click the Edit action for the appropriate message.
- From the navigation steps along the left, click Stationery. The Stationery page displays.
- Click the appropriate stationery.
- To view how a message looks with the selected stationery:
- Click Preview. The Preview window pops open with the stationery elements displayed.
- To make a different selection, close the Preview pop-up, select a different stationery, and click Preview again.
- Repeat these steps until you have the appropriate stationery selection.
- Click Save. Your changes are saved.
Editing the Message Content
You can edit both the HTML and plain text content of your message. If you are making small modifications to the text in the HTML body content, you may want to keep track of your changes and make them manually in the plain text area in order to avoid overwriting any changes you have already made in the plain text (for example, if you added spacing around certain paragraphs or introductory text for links).
WARNING: Be careful when transferring changes that you make to the HTML version to the plain text version. Simply clicking Update Plain Text copies the current HTML version into the plain text version so any changes you may have made to the plain text version will be lost. It may be simpler to keep track of your changes and make them manually in the plain text editor.
To make changes to the message content:
- From the Message List, click Edit from the Actions column of the appropriate message.
If the Message List page is not displayed:- From Email in the top navigation, click Email Campaigns. The Email Home page displays.
- Click the Campaigns tab. The Email Campaign List page displays.
- Click the Manage action for the appropriate campaign. The Campaign Summary page displays.
- Click the Messages tab. The Messages List page displays.
- Click the Edit action for the appropriate message.
- To make changes to the HTML Content:
Note: If you are making a few wording changes, you may want to copy and paste them into a text editor (like Notepad) or otherwise keep track so you can enter them directly into the Plain Text Content as necessary. If you click Convert to Plain Text again, the system will overwrite any changes you made previously in that (the Plain Text Content) window.- From the navigation steps along the left, click HTML Content. The WYSIWYG Editor page displays.
Note: To make changes to the plain text content only, skip to Plain Text Content changes step. - Enter your content, or paste it in from another source. Use the full features of the WYSIWYG to enter and format text; apply styles, incorporate background colors; insert images, tables, links, and contact information; and add personalization and other Convio components. For more information, refer to Using the WYSIWYG Editor.
Notes:
(1) We do not recommend that you embed a survey in an email message; instead, create a link to the survey. For assistance, refer to the Managing Surveys.
(2) If you have selected a custom stationery, be sure the stationery contains an unsubscribe link. You can easily add the link now at the end of the message by entering and then selecting appropriate text, clicking Links, selecting Browse Convio Links, selecting Email, clicking Unsubscribe, and then clicking Insert from the Unsubscribe dialog box.
(3) As you work with the message content, click Save to keep from losing any work. - When you have entered and saved content, click Preview to check how it will look to your recipients. The Preview window pops open with the message displayed. You can choose to preview your content as the Administrator, as an Individual Constituent of your choosing, or as members of a Group of your choosing. These previews can help you test any conditionals and personalization in the message.
- When you are finished, close the Preview window, make any changes, and repeat the previous steps.
- When you are satisfied, click Save. Your changes are saved.
- From the navigation steps along the left, click HTML Content. The WYSIWYG Editor page displays.
- Click Next. The Plain Text Content page displays.
- For the plain text version of your message, to:
- Manually enter the changes you made in the HTML content:
- Carefully type or paste in your changes in the area provided.
- When you are finished, click Save.
- Click Preview to check how it will look to your recipients. A separate window opens and displays the message. Again, you can preview the plain text as the administrator, as an individual constituent, or as members of a group would see it.
- When you are finished, close the Preview window, make any changes, and repeat the previous steps.
- Convert the entire HTML body content:
- Click Update Plain Text.
- Review the message and make any changes that are necessary (such as adding or removing space around wording, adding introductory text to links, and so on).
- When you are finished, click Save.
- Click Preview to check how it will look to your recipients. A separate window opens and displays the message.
- When you are finished, close the Preview window, make any changes, and repeat the previous steps.
- Manually enter the changes you made in the HTML content:
Archiving a Message
You can archive a message to make it inactive and hide it in the Messages List unless the Show Archived Messages option is enabled for the list.
Note: You cannot delete a message that has already been sent to recipients; instead you must archive it. However, you can delete a message that has never been sent instead of archiving it.
To archive a message: Click Archive from its Actions column in the Messages List.
If the Message List page is not displayed:
- From Email in the top navigation, click Email Campaigns. The Email Home page displays.
- Click the Campaigns tab. The Email Campaign List page displays.
- Click the Manage action for the appropriate campaign. The Campaign Summary page displays.
- Click the Messages tab. The Messages List page displays.
- Click the Archive action for the appropriate message.
Important: If the Show Archived Email Campaign Messages checkbox (below the list):
- Contains a checkmark, all existing Actions for the archived message, except Restore, are hidden.
- Does not contain a checkmark, the entire archived message is hidden from view.
Restoring an Email Message from the Archives
You can restore an archived email message to make it active again.
To restore an email message: Be sure the Show Archived Email Campaign Messages checkbox is checked (beneath the Message list). Click the Restore action from the appropriate message.
If the Message List page is not displayed:
- From Email in the top navigation, click Email Campaigns. The Email Home page displays.
- Click the Campaigns tab. The Email Campaign List page displays.
- Click the Manage action for the appropriate campaign. The Campaign Summary page displays.
- Click the Messages tab. The Messages List page displays.
- Make certain that the Show Archived Email Campaign Messages checkbox (beneath the list) is checked.
- Click the Restore action for the appropriate message. All of the available actions will again be displayed for the message.
- (Optional) Uncheck the Show Archived Email Campaign Messages checkbox to hide the remaining archived messages.
Deleting an Email Message
You can delete an email message that has never been delivered. If it has been delivered, you can make it inactive by archiving it.
To delete an email message: Click Delete from its Actions column in the Messages List.
If the Message List page is not displayed:
- From Email in the top navigation, click Email Campaigns. The Email Home page displays.
- Click the Campaigns tab. The Email Campaign List page displays.
- Click the Manage action for the appropriate campaign. The Campaign Summary page displays.
- Click the Messages tab. The Messages List page displays.
- Click the Delete action for the appropriate message.
- When asked to confirm your deletion, click Confirm. You will return to the Message List where your message will no longer be listed.
Setting Up a Recurring Delivery Schedule
When you set up a recurring delivery schedule for a message, the system automatically sends the same message at the specified interval (for example, on Monday of each week). Although the Target Audience is configured to receive the message each time, the system automatically filters audience members so that no one is sent a specific message more than once.
You can set up the recurring delivery to override the automatic filter so that your entire audience receives the message at each specified time interval. For example, you can schedule a daily message with dynamic content to be delivered every day to all target audience members.
To set up a recurring message delivery:
1. Open your email campaign containing the message to send. (From an Administrator page, choose Email on the navigation bar and select Email Campaigns in the drop-down menu. Then click the Campaigns tab and choose the Manage action beside the name of the campaign in the Email Campaign List.)
2. Click the Deliveries tab.
3. Click Setup a Recurring Delivery in the Related Actions area.
4. Locate the Message in the message list displayed and click Setup in its Actions column.
5. If you created variants and the list of variants appears, click Setup in the Actions column of the appropriate message (the Original Message or a Variant).
6. On the Setup page:
a Select a date and time for the initial recurring delivery by clicking the date and time drop-down menus.
b Select the delivery interval to use by clicking the appropriate button and then selecting the date on which to stop the recurring delivery using the month, day, and year menus.
c Determine if you should send a copy of this message at the recurring interval to those target group constituents who received the last one, by clicking the Send a Copy checkbox to enable this option.
IMPORTANT: If your message should be sent every time, you need to click this checkbox to OVERRIDE the default filter that prevents the system from sending more than one copy of the message to an email address (for example, if the message has dynamic content that changes daily).
d Click Next.
7. Review the Delivery Details.
8. If you want to change the Target Groups to receive the message:
a Click Select Target Audience Groups from the Related Actions area.
b Click on the Group Type you want to target. The list in the second pane (to the right) will display only groups of that type.
c If necessary, enter terms from the Group Name and/or Description in the Search box and then click Search. (Note that the Search feature will honor any Group Type that is selected in the pane at the left of the list.) The Search tab will be selected by default and any groups that match your search criteria will be listed under a single pane labeled Search Results. Click on a group to add it to the Selected list.
d Click the Group (or Groups) you want to add to the target audience. The Group (or Groups) will display in the Selected list pane. To remove a group, click on it in the Selected list pane.
e Click Next to save your changes and move on to the Do Not Email Groups page. Select the groups who should not receive this message, or click Cancel to return to the Delivery Details page.
9. If you want to change the constituents who should not receive the message:
a Click Select Do Not Email Groups in the Related Links area.
b Select the appropriate Group Type.
c Select the specific Group(s) from the second column to move them to the Selected area.
d Conversely, click any groups you want to Remove from the Do Not Email list by clicking on them in the Selected Groups list.
e Click Next to save your changes and go on to the Rebuild Target Groups page. Select the Groups to Rebuild or click Finish to return to the Delivery Details page.
10. To specify the group(s) to be rebuilt each time the message is sent:
a Click Select Group Rebuild Options in the Related Actions area.
b Click the appropriate checkboxes.
c Click Finish. (See more information about when groups may or may not rebuild.)
11. To apply specific constituent filters to your audience:
a Click Select Delivery Filters in the Related Actions area.
b Select:
u Constituents who Have Not Been Sent a Campaign Message checkbox to include those audience members who have subscribed to this campaign BUT who have not yet received a message from it.
u Constituents who Have Not Opened checkbox to include those audience members who have received a message from this campaign BUT who have not yet opened a message from it.
u Constituents who have opened a message but Have Not Clicked a Link checkbox to include those audience members who have received and opened a message from this campaign BUT who have not yet clicked through on any link.
u Constituents who have clicked through but Have Not Completed an Action checkbox to include those audience members who have received, opened and clicked through on a message from this campaign BUT who have not yet taken action.
u Constituents who Have Completed an Action checkbox to include those audience members who have received, opened, clicked through, and taken action based on a message from this campaign.
c Click Finish.
12. If you have the Advocacy application installed and this email relates to an advocacy alert, click Select Advocacy Filters in the navigation area, select your filters, and click Finish. For more information about these filters, see the Managing Advocacy online help.
13. To send this email message in plain text format only (and not send the HTML version):
a Click Select Delivery Options in the Related Actions area.
b Click Send plain text format only.
c Click Finish.
14. If your target group recipients may have secondary email addresses in their contact records and you want to send carbon copies to those email addresses:
a Click Select Delivery Options in the Related Actions area.
b Click the CC all recipient email addresses checkbox.
c Click Finish.
15. To determine the number of constituents who will actually be sent the message (for example, to exclude overlaps, apply the filters, and so on):
a Click Calculate Audience in the navigation area.
b Click Calculate Audience.
c Review the audience calculations displayed.
d Click Next.
16. If the calculations are:
u Acceptable and you want to send the message, click Next.
u Not acceptable and you must make changes, click the appropriate links to change the audiences groups and filters as necessary.
17. To place the message in the queue to be sent immediately or at the scheduled time, click Enable. The system displays the Delivery List page again with the  Your message has been scheduled for delivery message along the top of the page.